Emergency stabilization for occupied properties is the rapid, safety-first containment of water, fire, structural, or environmental hazards while residents remain in place. The goal is to stop damage, protect tenants, and preserve building systems. In London, ON, we execute this at 805 Chelton Rd–level rigor: assess fast, isolate risks, communicate clearly, and stabilize within hours.
By Mahal Concrete and Constructions • Last updated: 2026-06-04
Above-Fold Overview: Why This Guide Matters + Table of Contents
This guide gives property managers a complete, step-by-step framework to stabilize emergencies in occupied apartment buildings without unnecessary displacement. You’ll learn definitions, risk triage, methods by incident type, communication scripts, documentation, and handover steps. Use it to reduce vacancy time, maintain compliance, and protect residents and assets.
When a unit floods or a hallway ceiling sags, minutes matter. Here’s how to act decisively, keep tenants safe, and document every move so restoration and turnover run smoothly.
- What emergency stabilization means in multi-unit buildings
- How to triage, isolate, and communicate without panic
- Methods for water, fire/smoke, structural, and environmental incidents
- Tools, checklists, and documentation you can deploy today
- Real-world case snapshots from London apartment properties
- What Is Emergency Stabilization?
- Why It Matters in Occupied Buildings
- How Emergency Stabilization Works
- Types, Methods, and Approaches
- Best Practices (Tenant-First)
- Tools and Resources
- Case Studies and Examples
- Budget and Scope Considerations
- Compliance and Safety in Ontario Buildings
- FAQ
- Key Takeaways
- Conclusion and Next Steps
Quick Summary
Stabilize emergencies in occupied apartments by acting on four pillars: assess, isolate, communicate, and document. Contain hazards immediately, protect tenants’ access and safety, coordinate essential trades, and maintain clear records. This tight loop minimizes disruption, preserves property value, and accelerates restoration and turnover.
In our experience across 500+ projects, the properties that recover fastest use standardized finishes, clear playbooks, and consistent documentation shared across teams and vendors.
What Is Emergency Stabilization?
Emergency stabilization is the rapid containment and control of building hazards so residents remain safe and essential systems keep working. It focuses on immediate risk reduction, not full restoration. The outcome is a safe, temporary state that allows planned repairs without displacing tenants unnecessarily.
For multi-unit properties, stabilization bridges the gap between incident and restoration. We prioritize breathable containments, temporary supports, moisture and air management, and tenant-safe access routes.
- Scope: Water shutoff and extraction, smoke/odor control, temporary shoring, isolation barriers, essential utility protection.
- Timeframe: Initiate within hours; hold safely until permanent repair starts.
- Goal: Life safety first; then asset protection and service continuity.
This is not a substitute for full repair. It’s how you buy time, reduce damage spread, and keep your building operational during remediation.
Why Emergency Stabilization Matters in Occupied Buildings
In occupied properties, emergency stabilization prevents secondary damage, protects health, and keeps critical services running. The faster you isolate and ventilate, the lower the risk of mold, electrical faults, or structural movement—and the less disruption for paying tenants.
Occupied buildings add constraints: noise windows, quiet hours, elevator scheduling, and accessibility routes. We plan around residents while managing hazards head-on.
- Tenant trust and retention: Clear communication reduces anxiety and complaints.
- Regulatory posture: Safety-forward actions demonstrate diligence during any later review.
- Portfolio protection: Standardized steps scale across buildings and teams.
- Turnover efficiency: Quick stabilization shortens the road to move-in-ready units.
Here’s the thing—stabilization isn’t only about today’s incident. It’s about tomorrow’s leasing calendar and asset performance across your portfolio.
How Emergency Stabilization Works (Step-by-Step)
Execute a tight loop: assess hazards, shut down sources, isolate the area, communicate with tenants, and document actions. Deploy containment, ventilation, and temporary supports. Then transition to planned restoration with clear handover notes and updated timelines.
We use a repeatable sequence so your team and ours move in sync even in high-stress moments.
- Assess and triage: Identify life-safety risks, utilities, and affected units.
- Shut down sources: Water, power, gas in the impacted zone.
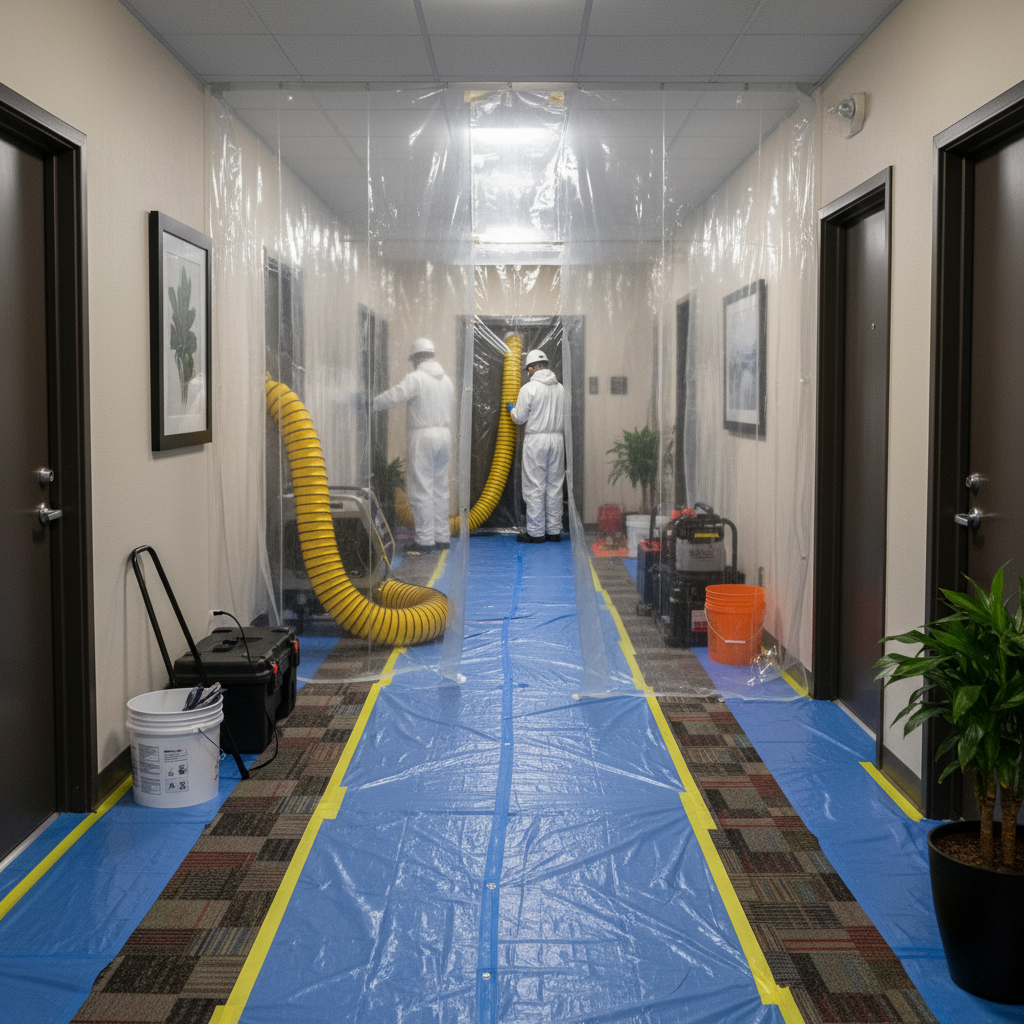
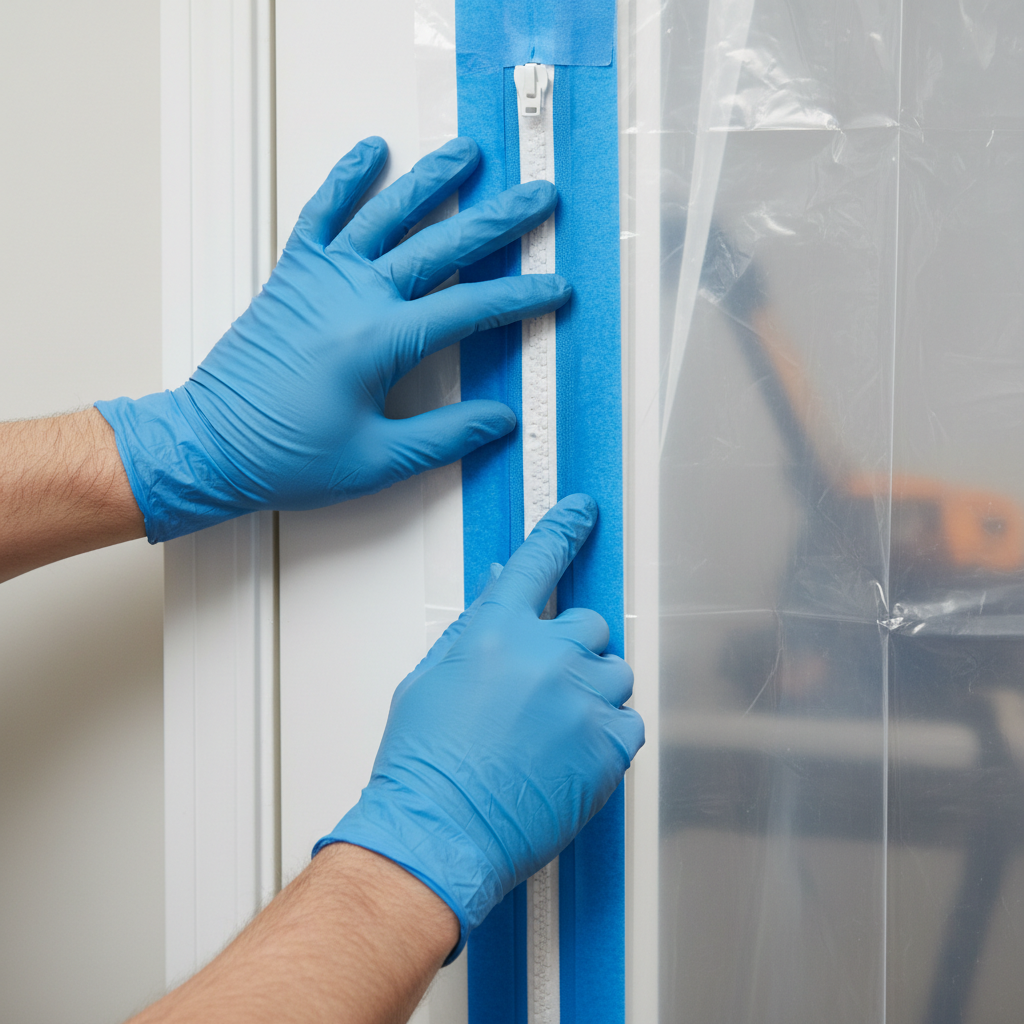
- Isolate: Install plastic containment and negative air if needed.
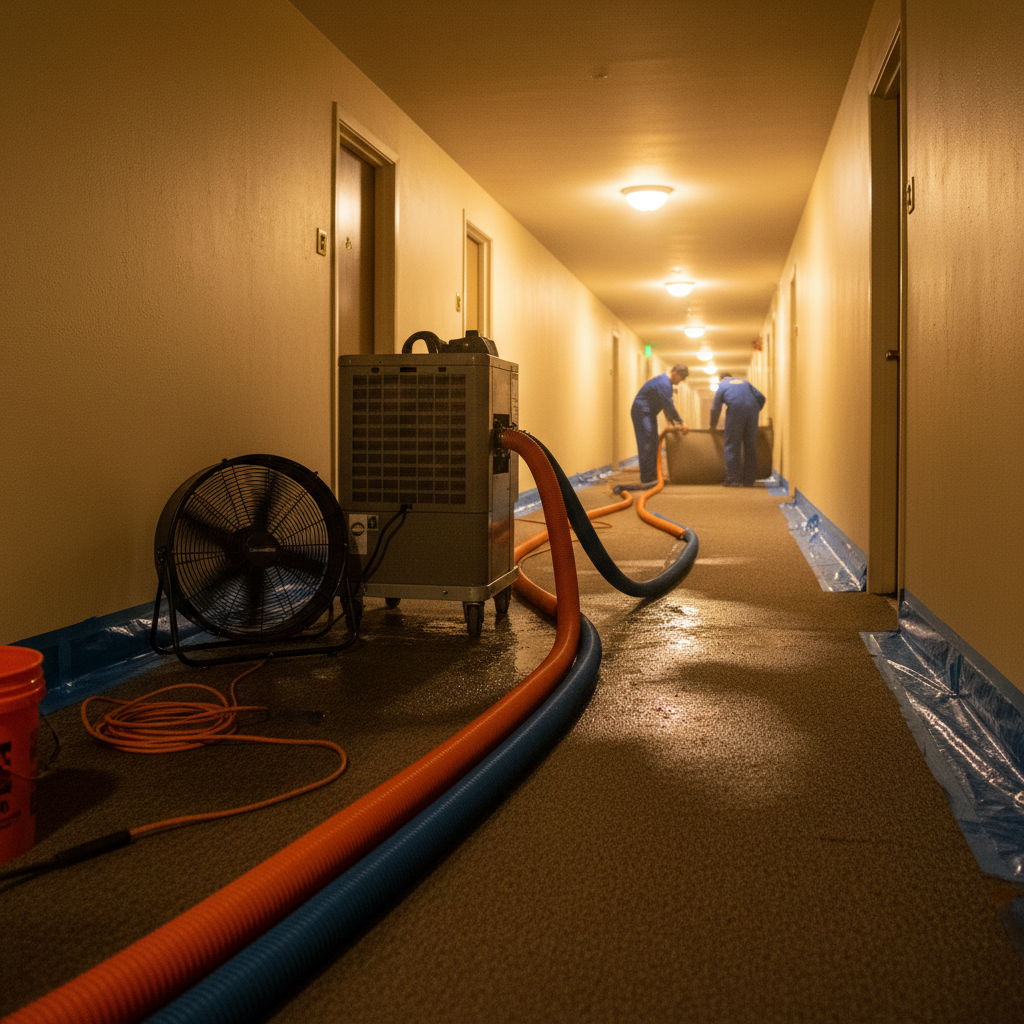
- Stabilize: Extract water, set air movers/dehumidifiers, shore where required.
- Communicate: Post notices, SMS/email updates, quiet-hours scheduling.
- Document: Photos, moisture readings, material logs, tenant notices.
- Handover: Define restoration scope, schedule, and access routes.
| Phase | Objective | Primary Actions | Responsible |
|---|---|---|---|
| Assess | Locate hazards | Walkthrough, photos, meters | Site lead + PM |
| Isolate | Stop spread | Shutoffs, barriers, signage | Technicians |
| Stabilize | Make safe | Extraction, air, shoring | Trades + GC |
| Communicate | Tenant safety | Notices, routes, schedules | PM + GC |
| Document | Evidence + plan | Logs, readings, updates | PM + GC |
| Handover | Restore | Scope, timeline, QC | GC + Owner |
For a deeper walkthrough of the post-stabilization phase, see our full unit turnover guide, which shows how standardized finishes accelerate move-in readiness.
Types, Methods, and Approaches
Different incidents demand different stabilization tactics. Water calls for fast extraction and drying; smoke events focus on odor and particulate control; structural movement may need temporary shoring; environmental hazards prioritize isolation and ventilation. Matching method to incident keeps tenants safe and reduces secondary damage.
Water intrusion and plumbing failures
- Shut off the source; tag valves.
- Extract standing water; remove baseboards if saturated.
- Run air movers and dehumidifiers; monitor with moisture meters.
- Protect corridors with runners; maintain egress routes.
Practical tip: share a simple “what to do” checklist with tenants. For an overview of basic steps in domestic plumbing incidents, see this field note from Everest Plumbing.
Fire, smoke, and odor events
- Install negative air machines with HEPA filtration.
- Seal returns; protect supply vents to avoid cross-contamination.
- Use odor counteractants and safe surface wipes; stage debris handling.
- Coordinate with restoration for cleaning and repainting protocols.
Small kitchen fires in stacked apartments can impact multiple floors. Containment and ventilation are your first tools to avoid building-wide complaints.
Structural movement or impact
- Set exclusion zones; reroute foot traffic.
- Install temporary shoring where engineered or vendor-approved.
- Log cracks/deflection with photos; flag for engineering review.
- Protect utilities near affected elements.
Environmental and air quality hazards
- Isolate with 6-mil plastic; zipper doors at entries.
- Establish negative pressure; verify with manometer if available.
- Stage PPE and signage; schedule quiet-hour work blocks.
- Coordinate waste handling per local requirements.
Security staff often support incident control. For training context on emergency roles, see this overview of security response roles.
Best Practices for Emergency Stabilization in Occupied Properties
Lead with tenant safety, control the environment, communicate clearly, and document everything. Use standardized finishes and repeatable playbooks so multiple buildings get the same, predictable outcome. This discipline reduces vacancy days and raises resident confidence.
Communication that calms and informs
- Post clear door and lobby notices with timelines and contact options.
- Send brief SMS or email updates with plain-language steps.
- Offer alternate access routes and quiet-hour schedules.
- Log all notices and updates for future reference.
Containment, access, and cleanliness
- Zip-door containments at affected entries; clean work paths daily.
- Protect flooring with runners; cap ends of hoses to control drips.
- Maintain ADA-compliant egress routes in common areas.
- Use HEPA air scrubbers when dust or smoke particulates are present.
Documentation and handover
- Daily photos, moisture logs, and action summaries.
- Material and equipment logs by zone.
- Handover briefs that define scope, finishes, and schedule.
- QC checklist before removing containments.
Consistency is the quiet superpower here. The same steps, the same finishes, the same logs—applied across every building in your portfolio.
Tools and Resources You Can Use This Week
Equip teams with a lean, mobile-ready kit: shutoff maps, moisture meters, air movers and dehumidifiers, HEPA scrubbers, plastic containment materials, and standardized notice templates. Pair tools with checklists and logs so your documentation is as strong as your field response.
- Response kit: Valve keys, lockout tags, flashlights, PPE.
- Environment control: Air movers, dehumidifiers, HEPA scrubbers, hygrometers.
- Containment: 6-mil plastic, zipper doors, tape, poles.
- Meters: Non-invasive moisture meter and pin-type for confirmations.
- Templates: Tenant notices, incident logs, handover briefs.
To build a stronger playbook, borrow elements from our emergency repair checklist and align it with your turnover steps from this apartment turnover process.
Case Studies and Examples (London, ON)
Real incidents show what works: contain quickly, manage airflow, keep access open, and communicate. With a WSIB-compliant, fully insured team, we stabilize hazards fast, then move to restoration and standardized finishes so units re-enter leasing pipelines without surprises.
- Stack riser leak, mid-rise apartments: We shut off the floor zone, extracted water in two corridors, and ran scrubbers overnight. Tenants used an alternate stair core. The next morning, we logged moisture readings and coordinated baseboard resets.
- Microwave flare-up in a studio stack: Smoke odor affected three floors. Negative air with HEPA, supply protection, and controlled access cut complaints. Paint and odor control followed within the week.
- Ceiling deflection after heavy snow load: We set a small exclusion zone, installed temporary shoring, and scheduled engineering review. Tenants stayed in their homes with clear access and updates.
These moves are repeatable. The better your documentation and finishes catalog, the faster every subsequent incident resolves.
Budget and Scope Considerations (No Pricing)
Think in scopes, not surprises. Define what “stabilized” means for each incident, align on finishes and restoration boundaries, and schedule access windows that respect tenants. Clear scopes prevent rework and keep turnover timelines on track—without discussing specific prices.
- Scope clarity: What gets contained, removed, dried, or temporarily supported?
- Finish standards: Pre-approved paint, trim, flooring, and cabinet specs minimize decisions later.
- Access windows: Quiet hours, elevator bookings, and tenant escorts where required.
- Documentation bundle: Logs, readings, photos, and handover doc that align with your turnover process.
If your team wants a structure to plan end-to-end, our notes on turnover scope templates help connect stabilization to final handover.
Compliance and Safety in Ontario Buildings
A WSIB-compliant, fully insured contractor with safety-first protocols is essential in occupied properties. Clear tenant notices, signed access permissions, and tidy worksites protect everyone. When legal or security questions arise, coordinate with your legal counsel and security team promptly.
Tenant rights and landlord obligations shape how you communicate and access units. For a practical legal perspective, review this Ontario-focused guide to tenant rights and align internal policies accordingly.
Local considerations for London
- Weather swings can shift priorities; plan for sump and roof checks after heavy rain or thaw, and communicate proactively with tenants in London throughout ON.
- Holiday and exam seasons often mean quiet-hour adjustments in multi-unit properties; post schedules in common areas and send SMS updates.
- Coordinate with building security for controlled access during evening work; align roles using this security response primer.
Need a stabilization playbook you can use tomorrow? We’ve helped property managers across Southwest Ontario cut disruption and speed unit turnovers with standardized finishes and clean handovers.
Download our planning checklist and pair it with your emergency checklist to close the loop from incident to move-in ready.
Frequently Asked Questions
Property managers ask how to act fast without displacing tenants, what tools to stage, and how to document events. These concise answers outline the essentials: safety-first isolation, communication, clear logs, and a disciplined handover to restoration.
What’s the difference between stabilization and restoration?
Stabilization stops hazards and makes spaces safe to occupy; restoration returns finishes and systems to pre-incident condition. In occupied properties, we stabilize first—contain, ventilate, support—then hand off to planned repairs and finish work.
How do we keep tenants calm during a late-night incident?
Use clear, brief notices that explain what happened, what’s safe, and the next update time. Offer alternate routes and set quiet-hour work blocks. Document messages and provide a single point of contact for questions.
Which tools should be on-site for water incidents?
Stage shutoff maps, valve keys, moisture meters, air movers, dehumidifiers, and containment materials (6-mil plastic, zipper doors, tape). Protect egress routes and log moisture readings daily until stable.
When should security be involved?
Bring security in when rerouting access, working after hours, or controlling traffic near exclusion zones. Align roles in advance; a basic primer like this security response guide helps define expectations.
Key Takeaways
Emergency stabilization for occupied properties hinges on speed, safety, and standardization. Assess quickly, isolate hazards, communicate clearly, and document every step. Then hand off to restoration with standardized finishes to shorten vacancy windows and protect tenant experience.
- Act on four pillars: assess, isolate, communicate, document.
- Match methods to incidents (water, smoke, structural, environmental).
- Use standardized finishes to speed restoration and turnovers.
- Keep routes accessible and tenants informed at every step.
Conclusion and Next Steps
A disciplined stabilization program protects tenants and assets while keeping your leasing pipeline moving. Pair fast field response with clear scopes, standardized finishes, and clean handovers to win back days on every incident.
If you manage apartments in London or across Southwest Ontario, we can help you stand up a ready-to-run program—complete with checklists, finishes catalogs, and tenant communication templates.
Ready to align stabilization with faster turnovers? Book a discovery session in London and let’s map your playbook from incident to move-in ready.