Bathroom remodeling checklist for rental units refers to a standardized, step-by-step plan that ensures durable finishes, code-aware safety, and a fast, low-disruption turnover. From our London, ON base at 805 Chelton Rd, Mahal Concrete and Constructions uses this checklist to reduce vacancy time and hand over move-in-ready units consistently across multi-unit properties.
By Amaruppdesh Singh · Mahal Concrete and Constructions
Last updated: 2026-06-02
We specialize in multi-unit construction, full unit turnover, and apartment renovations across Southwest Ontario. Our structured approach—site assessment, detailed proposal, scheduled execution, and rigorous quality check—has supported 500+ projects with standardized finishes and predictable delivery. This complete guide shares the exact framework we use for rental bathrooms.
Quick Summary & Table of Contents
Use this checklist to plan, execute, and sign off a rental bathroom remodel with minimal downtime. It covers scope setting, waterproofing, fixture standards, ventilation, finishes, inspections, and final turnover QA. Each step emphasizes durable materials, safety, and repeatable processes across multiple units.
In this guide, you’ll find:
- What a rental bathroom checklist includes and why it matters
- How to move from assessment to final handover without delays
- Durability standards for high-traffic, multi-unit environments
- Inspection points and a punch list you can copy
- Non-pricing budget drivers and timeline planning
- What Is a Rental Bathroom Remodeling Checklist?
- Why This Checklist Matters for Property Managers
- How the Process Works (Step-by-Step)
- Scope Types and Approaches
- Best Practices for Durability and Safety
- Tools, Templates, and Resources
- Timeline and Scheduling
- Budget Drivers and Priorities
- Case Studies and Examples
- FAQ
- Key Takeaways
- Conclusion & Next Steps
What Is a Rental Bathroom Remodeling Checklist?
A rental bathroom remodeling checklist is a repeatable blueprint covering assessment, demolition, waterproofing, fixture selections, ventilation, finishes, inspections, and turnover QA. It standardizes decisions and quality checks so multi-unit renovations run faster, safer, and deliver consistent, tenant-ready results—especially valuable across large portfolios.
Here’s what we include in every rental bathroom scope:
- Assessment: Document existing conditions, measure, photograph, and note code/safety risks.
- Demolition plan: Define selective vs. full removal; protect adjacent rooms; plan debris handling.
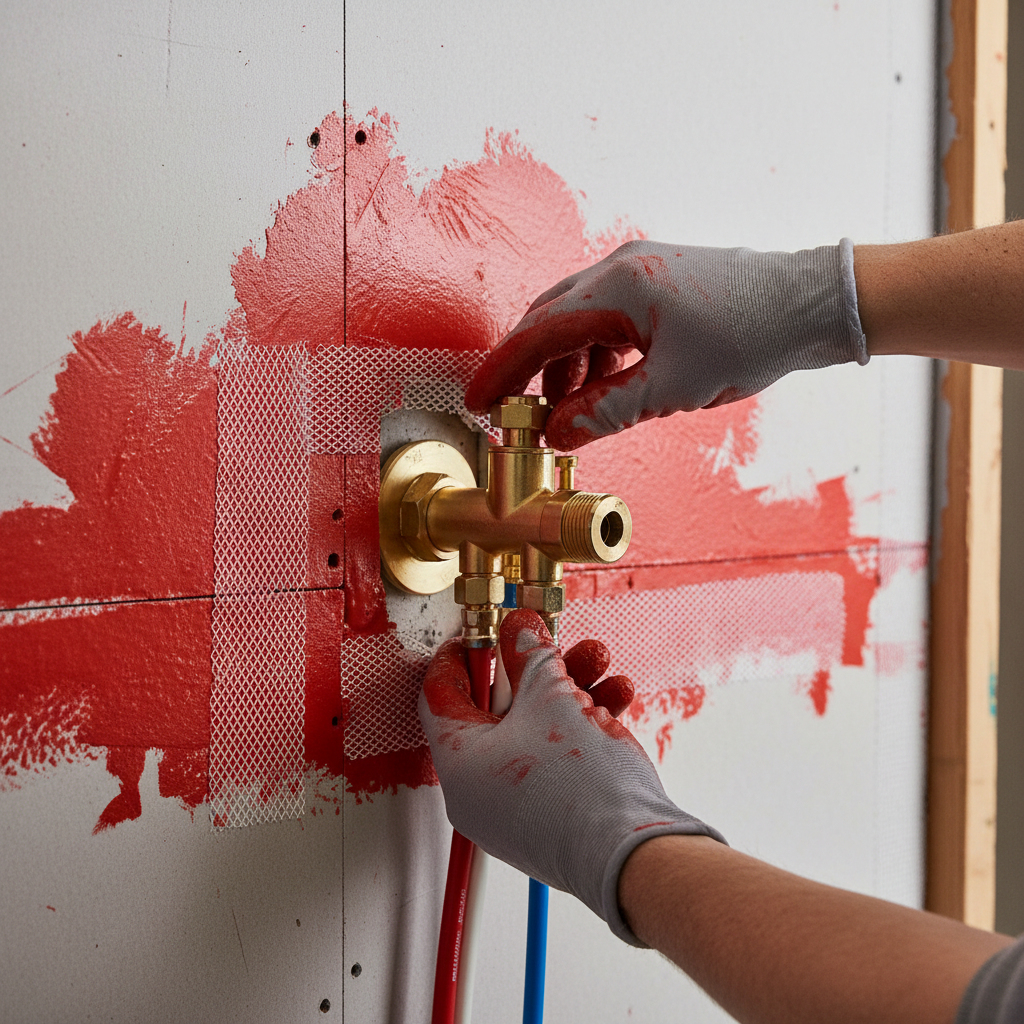
- Waterproofing: Use backer board, membranes, and sealed penetrations in all wet zones.
- Fixtures & plumbing: Standardize faucet, valve, toilet, and shower components across units.
- Electrical & ventilation: GFCI protection, lighting levels, and a vent fan that actually moves air.
- Finishes: Tile or waterproof LVT, semi-gloss paint, moisture-resistant trims and caulks.
- Quality checks: Pressure, flow, and leak tests; fan cfm performance; grout/caulk continuity.
- Turnover: Cleaning, punch list closeout, and handover documentation.
In our experience, having decisions pre-made—for example, one toilet SKU and one faucet line—can shave days off ordering and installation. Silicone sealant typically reaches full cure in about a day, so we schedule final cleaning after that window to protect joints.
Why This Checklist Matters for Property Managers
This checklist shortens vacancy, increases durability, and lowers callbacks. Standardized SKUs, proven waterproofing, and fast inspections reduce rework. For London, ON portfolios, a repeatable process across buildings means predictable scheduling, easier inventory control, and consistent, market-ready bathrooms tenants notice.
Why property teams rely on checklists for rental bathrooms:
- Reduced vacancy time: Coordinated trades and pre-approved SKUs help compress timelines.
- Durability in high traffic: Waterproof LVT, porcelain tile, and chrome hardware resist wear.
- Safety and compliance: GFCI, fan exhaust to exterior, and anti-scald valves protect residents.
- Portfolio consistency: Standardized finishes simplify maintenance and spare-part storage.
- Clear documentation: Photos, test results, and sign-offs make turnovers defensible.
Even small oversights compound. A missed bead of sealant near a tub flange can channel water behind walls within days. A fan that isn’t ducted outdoors can push moisture into cavities, raising the risk of mold over seasons. Checklists keep these risks visible and actionable.
How the Process Works (Step-by-Step)
The best rental bathroom remodels follow a clear path: assess, scope, schedule, prep, demo, rough-in, waterproof, tile/finishes, install fixtures, paint/trim, test, clean, and hand over. Each step has defined checks so issues are caught early and units return to market faster.
Our structured, end-to-end sequence
- 1) Site assessment: Measure, photograph, and record plumbing/electrical locations; flag safety issues.
- 2) Scope finalization: Select fixtures and finishes from the building’s standard set; confirm lead times.
- 3) Timeline planning: Sequence trades to minimize idle time; plan inspections with 24–48 hours notice.
- 4) Protection & prep: Cover floors and corridors; post notices for neighbors; set up negative airflow if needed.
- 5) Demolition: Selective removal to keep costs and noise down; protect drains to avoid debris clogs.
- 6) Rough-in: Position valves at comfortable reach; set toilet flange height; run dedicated GFCI circuit if required.
- 7) Waterproofing: Backer board, taped seams, corner reinforcement, and membrane coverage to showerhead height.
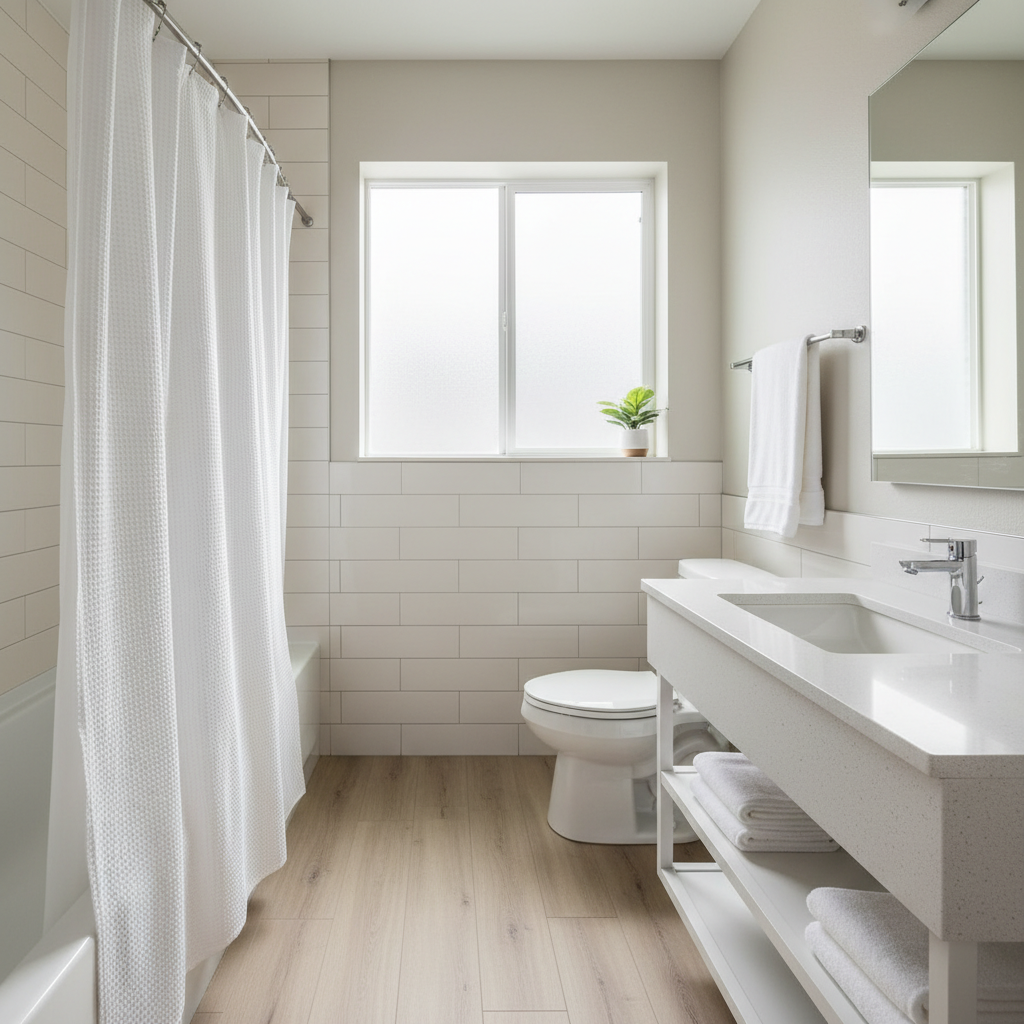
- 8) Finishes: Tile layout for minimal cuts; waterproof LVT in dry zones; semi-gloss paint for wipeability.
- 9) Fixture set: Install standardized faucets, shower trims, vanity, toilet, and accessories with blocking.
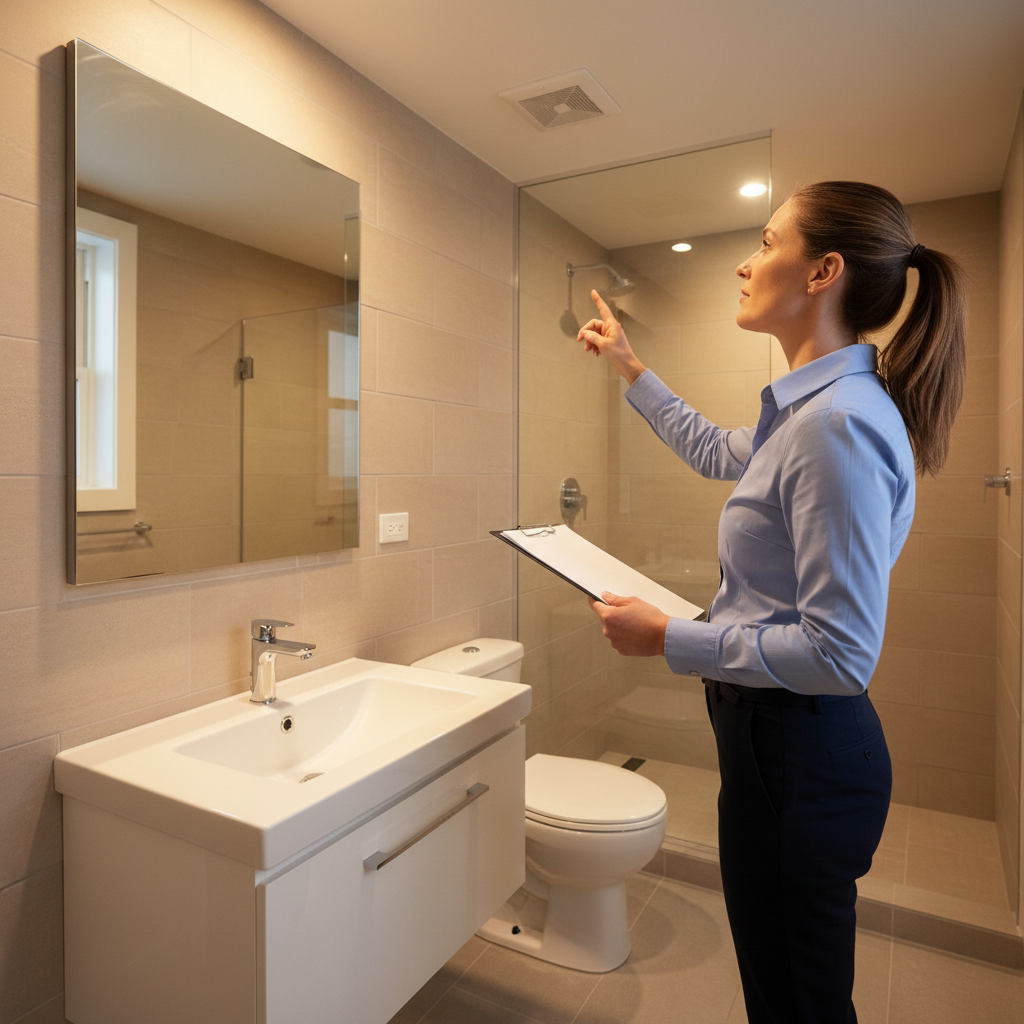
- 10) QA & tests: Pressure tests; fill-and-hold tub check; fan CFM verification; GFCI trip test.
- 11) Clean & handover: Post-cure wipe-downs, mirror/polish, punch list sign-off, and photo documentation.
We stage materials one unit ahead to keep momentum. Silicone typically needs about 24 hours to cure; grout haze is easier to remove within the first few hours. Scheduling with these windows in mind prevents rework and speeds turnover.
Scope Types and Approaches
Define scope by tenant impact and lifecycle value. For rentals, light refreshes swap fixtures and paint; mid-scope adds waterproofing and selective tile; full gut resets systems for longest service life. Standard SKUs across scopes keep ordering simple and timelines tight.
Light refresh (turnover-friendly)
- Targets: Paint walls/ceilings; replace vanity top, faucet, and accessories.
- Waterproofing: Reseal wet-area transitions; re-caulk perimeter joints.
- When to choose: Good bones, minor wear; 1–3 day turnaround typical.
Mid-scope remodel (selective upgrades)
- Targets: New tub/shower trim kit, new toilet, LVT floor, and selective wall tile.
- Waterproofing: Backer board at wet walls; membrane in splash zones.
- When to choose: Moderate wear, recurring maintenance; typical within a compact turnover window.
Full gut (longest lifecycle)
- Targets: Open walls, replace valves and lines, full tile surround, new ventilation, new GFCI circuit.
- Waterproofing: Full system with taped seams and flood test where appropriate.
- When to choose: Persistent moisture damage, outdated systems, or repeated leaks.
For multi-property portfolios, we map each building to one of these scope levels to forecast materials, labor windows, and inspection cadence. Repeatability across buildings trims days from schedules.
Best Practices for Durability and Safety
Prioritize waterproofing, ventilation, and standardized, durable finishes. Use backer board and membranes, vent to the exterior, select chrome or stainless fixtures, and choose wipeable paints. Block and anchor accessories, verify GFCI, and test fan airflow so moisture exits the building.
Waterproofing that actually lasts
- Backer board, not drywall, in wet areas; tape seams and corners.
- Continuous membrane from tub lip to above shower head; seal penetrations.
- Flood tests for pans/tubs can reveal pinholes before finishes go on.
Ventilation and moisture control
- Duct fans outdoors to remove humid air; avoid attic/cavity discharge.
- Run-time guidance: 20–30 minutes after showers improves drying.
- Make it intuitive: Pairing fan with light switch increases actual use.
Fixtures and finishes that shrug off wear
- Porcelain tile and waterproof LVT hold up in turnovers.
- Semi-gloss paint resists moisture and cleans easily.
- Chrome or stainless hardware hides fingerprints and resists corrosion.
We standardize a single faucet family and toilet spec per property. That means one angle-stop size, one supply line length, and one wax ring height on the truck. The fewer variables, the fewer callbacks. Most GFCI receptacles trip and reset in seconds—verify with a tester during QA.
Local considerations for London
- Plan tenant notices and quieter demo hours to respect neighboring suites in London’s multi-unit buildings.
- Winter humidity swings can be sharp; confirm fan performance and use semi-gloss paints that handle seasonal moisture.
- For portfolios across ON, align standard SKUs so procurement stays predictable when you scale units.
Tools, Templates, and Resources
Use a pre-built scope sheet, material takeoff, and punch list to speed planning and sign-off. Pair them with photo logs and a simple fan/GFCI test record. These light-weight tools give property managers clear proof the bathroom is safe, durable, and move-in ready.
Templates we deploy on every project
- Scope & selections sheet: Lists fixtures, finishes, SKUs, and colorways; stores vendor and lead-time notes.
- Waterproofing checklist: Seams taped, penetrations sealed, membrane height reached, flood/hold result recorded.
- QA punch list: GFCI test, fan exhaust verification, bead continuity, grout finish, and caulk cure confirm.
- Turnover log: Photos of all corners, valves, and under-vanity traps for future maintenance.
Simple tools that prevent rework
- Moisture meter: Confirms substrates are dry before tile or paint.
- GFCI tester: Validates protection with one-button press.
- Flow cone or bag: Quick sense-check of shower head output alongside manufacturer spec.
We keep these documents on a shared drive so supers and portfolio managers can review progress anytime. For client privacy, see our privacy policy for how we handle project media.
Timeline and Scheduling
Build a day-by-day plan that respects cure times and inspection windows. Protect adjacent spaces, sequence trades to avoid idle gaps, and schedule QA before cleaning. A clear timeline trims days from vacancy and prevents double-handling.
Here’s a compact, turnover-friendly process table you can adapt:
| Phase | Primary Owner | Core Actions | Typical Window |
|---|---|---|---|
| Assessment & Scope | PM + GC | Measure, photos, selections, approvals | 0–1 day |
| Protection & Demo | GC | Cover paths, selective removal, debris control | 1 day |
| Rough-In | Plumber + Electrician | Valves, GFCI circuit, fan ducting | 1 day |
| Waterproofing | GC | Backer board, membrane, seam taping | 0.5–1 day |
| Finishes | GC | Tile/LVT, grout, paint | 1–2 days |
| Fixtures & Trim | GC | Vanity, toilet, trims, accessories | 0.5–1 day |
| QA, Clean, Handover | GC + PM | Tests, punch, documentation | 0.5–1 day |
Sealants often need about a day to cure; plan cleaning after that so joints aren’t disturbed. If your building requires notice for water shutoffs, schedule rough-in accordingly and post tenant notices at least a day in advance.
Budget Drivers and Priorities
Focus spend where it prevents moisture damage and frequent callbacks: waterproofing, ventilation, and reliable fixtures. Save by standardizing SKUs, reusing sound subfloors, and choosing simple tile layouts. Avoid scope creep that doesn’t impact durability or tenant appeal.
- Spend here first: Waterproofing system, vented fan, valves, and shutoffs that actually shut off.
- Standardize to save: One faucet family, one toilet spec, one vanity size per property.
- Design for speed: Subway tile patterns go up faster; single-color palettes ease touch-ups.
- Avoid hidden risks: Replace questionable backer or mushy subfloors now to prevent repeat work.
We never publish pricing; scopes vary. Instead, we help you right-size a scope to the unit class and tenant profile. Our London apartment contractor team can guide you on lifecycle trade-offs without locking you into one-off selections.
Case Studies and Examples
Portfolio managers see the fastest wins when scopes are standardized. In London, ON, we’ve reduced vacancy windows by aligning finishes, pre-approving SKUs, and sequencing trades to avoid idle time. These mini-examples show how small decisions compound into predictable schedules.
Example 1: Mid-scope across a 12-unit stack
- Situation: Tile failures and mismatched fixtures across floors created maintenance drag.
- Action: Standardized valve trims, waterproof LVT, semi-gloss paints, and identical vanities.
- Result: Fewer parts to stock, faster turnovers, and simpler make-readies between tenants.
Example 2: Full gut in a moisture-prone line
- Situation: Recurrent leaks behind surrounds; fans ducted into cavities.
- Action: New backer, full membrane, exterior-ducted fans, GFCI verification, and flood tests.
- Result: Moisture stayed out of wall assemblies; callbacks dropped noticeably.
Example 3: Light refresh during peak season
- Situation: Turnovers peaked in summer; vacant days risked compounding.
- Action: Paint, caulk renewal, vanity top swap, and standardized accessories.
- Result: Quick wins improved renter perception while keeping schedules tight.
When working with clients in London, we often preload one unit with materials while another is in demo. This rolling strategy keeps crews productive and makes handovers more reliable across a portfolio.
Frequently Asked Questions
Quick answers to common rental bathroom questions: how to scope, what to prioritize, how to test waterproofing and ventilation, and how to keep turnovers predictable across multi-unit buildings without surprises.
What should I prioritize first in a rental bathroom remodel?
Start with waterproofing, ventilation, and reliable fixtures. These prevent moisture damage and callbacks. Then focus on durable, wipeable finishes like porcelain tile or waterproof LVT, followed by standardized accessories and a clean, simple paint palette.
How do I keep the timeline on track for multi-unit turnovers?
Pre-approve SKUs, stage materials, and sequence trades. Respect cure times and book inspections with notice. Use a shared punch list and require photo documentation before sign-off to prevent backtracking.
What’s the simplest way to verify my waterproofing?
Tape and seal all seams, then perform a flood or hold test where appropriate. Photograph corners, penetrations, and membrane height. If the level drops or dampness appears, fix it before moving to finishes.
Which finishes hold up best between tenants?
Porcelain tile, waterproof LVT, and semi-gloss paints handle traffic and moisture well. Choose chrome or stainless fixtures and simple, standardized accessories so replacements are quick and consistent.
Key Takeaways
Standardize scopes, waterproofing, and SKUs. Verify ventilation and GFCI. Use a tight timeline with defined QA before handover. These steps cut vacancy days and produce consistent, tenant-ready bathrooms across your portfolio.
- Checklists keep scope tight and prevent hidden moisture risks.
- Durable finishes plus standardized fixtures reduce callbacks.
- Defined QA steps and photo logs make handovers defensible.
- Rolling schedules keep trades moving and shorten vacancies.
Conclusion & Next Steps
A proven rental bathroom checklist accelerates turnover and elevates tenant experience. If you manage multiple units, standardization is your leverage—materials, fixtures, and QA all pre-decided so schedules hold and units show well.
Need a bathroom refresh, mid-scope, or full gut aligned to your building’s standards? Our WSIB-compliant, fully insured team in London can help. Review our approach on the Mahal Concrete and Constructions site and request a portfolio-aligned assessment.
Soft CTA: Ready to align scopes across your properties? Contact our London team via the site. Terms apply.
Related Articles
Explore more on apartment turnovers and standardized scopes. These topics connect directly to predictable timelines, consistent finishes, and tenant-ready handovers across multi-unit properties.
We cover apartment turnovers, standardized finishes, and maintenance-friendly upgrades on our blog—see a recent post on our company blog. For an overview of our services and safety-first approach, visit the homepage.
For broader renovation planning perspectives and timelines, compare approaches like this project management timeline, notes on practical bathroom upgrades, and common trends to avoid during remodels.