
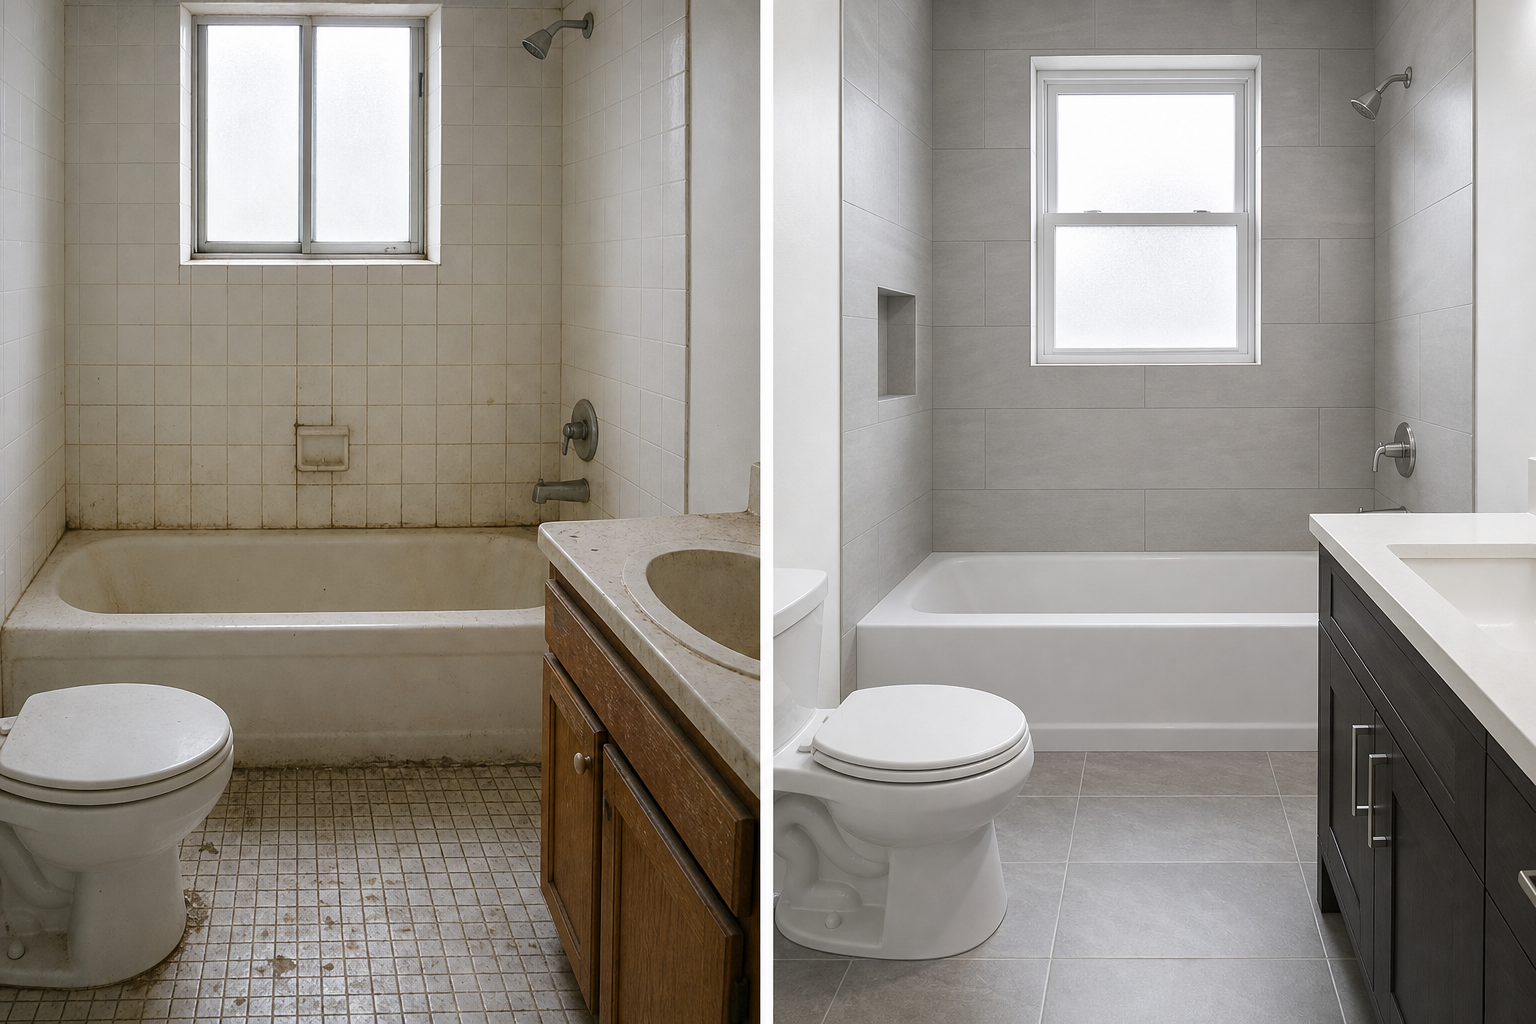

Bathroom tile replacement for rentals: specs, timelines, and checklists that cut downtime
Bathroom tile replacement for rentals needs a different playbook than owner-occupied remodels. Landlords, property managers, and apartment owners care about durable finishes, predictable schedules, and clean turnovers that photograph well. This article offers a practical, repeatable framework to scope the work, choose materials that hold up to frequent turnovers, plan a tight sequence, control cost drivers, and finish with a maintenance plan—so you can reduce vacancy days and keep units consistent across a portfolio.
When to replace tiles vs. repair or refresh
Before you authorize full bathroom tile replacement for rentals, confirm whether a targeted repair will do. Use this decision checklist to right-size the scope:
- Cracks and chips: Spot repairs are fine for isolated, hairline defects; widespread cracking suggests substrate movement or age—replace.
- Hollow sounds underfoot: Tapping and hearing hollow areas points to bond failures; localized failures may be re-bonded, but extensive hollowness typically warrants full replacement.
- Grout condition: Re-grouting can refresh joints, but powdery, stained, or missing grout across large areas often indicates water intrusion—evaluate substrate and consider full replacement.
- Water staining or musty odours: Persistent moisture issues, swollen baseboards, or discoloured drywall often mean the waterproofing behind tile is compromised—replace and address substrate/waterproofing.
- Loose or drummy wall tile: Widespread de-bonding usually can’t be reliably patched in rentals; replacement is the safer long-term move.
- Aesthetic mismatch: If you’re standardizing unit finishes across a building, a full reset may be faster than chasing colour matches for discontinued tiles.
When in doubt, sample a small area behind a removable trim or a discreet tile to inspect the substrate. If you uncover failed backer board, inadequate waterproofing, or uneven substrates, plan for full replacement rather than piecemeal fixes.
Choosing durable tiles and grout for rental traffic
Material choices directly affect maintenance burdens and tenant satisfaction. For bathroom tile replacement for rentals, favour standardized, widely available SKUs and finishes that clean quickly and hide everyday wear.
- Tile type: Porcelain is dense and moisture-resistant for floors and wet walls. Ceramic can perform well on dry walls. Use slip-conscious finishes for floors.
- Tile size: Mid-size formats (e.g., 8×8 to 12×24) balance speed and layout flexibility. Oversized panels look sleek but complicate cuts in small bathrooms; mosaics add slip resistance but increase grout lines and maintenance.
- Colour and pattern: Neutral, light-to-mid tones brighten small spaces and show well in listings; subtle variegation or stone-look patterns help mask minor water spots and soap residue between cleans.
- Trim and transitions: Stock ceramic or metal trims simplify edge terminations and speed installs, supporting a cleaner finish across many units.
- Grout selection: High-performance cementitious or epoxy grouts resist staining and shrinkage. Pre-mixed options can cut install time and reduce call-backs in rentals.
- Sealants and movement joints: Use quality silicone at all change-of-plane joints (wall-to-floor, wall-to-tub) and around penetrations to accommodate movement and keep water out.
Standardize your palette. A single, repeatable tile and trim package per property—kept in light back stock—helps you turn units faster and avoid discontinued-product headaches.
Scope of work and sequencing that speed turnovers
Well-defined scopes and a tight sequence protect schedules. Here is a proven order of operations for bathroom tile replacement for rentals:
- Protect and isolate: Cover adjacent floors and hallways, cap drains, and set up dust control at the unit entry.
- Demo and disposal: Remove existing tile, backer board as required, and damaged drywall; dispose cleanly to avoid corridor messes.
- Rough-in checks: Confirm fixture locations, assess plumbing penetrations, and address any substrate moisture or rot before rebuilding.
- Substrate prep: Install appropriate backer board or underlayment, flatten or level as needed, and prime surfaces per manufacturer guidance.
- Waterproofing: Apply a continuous waterproofing system in wet zones (tub/shower walls, floors near wet areas) with proper overlaps and curing time.
- Dry layout: Plan tile layout to centre lines of sight, minimize slivers, and confirm transitions at the tub lip, threshold, and niches.
- Tile installation: Set wall tiles first in showers/tub surrounds, then floors. Maintain consistent joint widths and plane.
- Curing and grouting: Allow thinset to cure, then grout with your standardized product. Clean thoroughly to reduce haze.
- Seal and caulk: Seal grout if specified; apply silicone at all changes of plane and penetrations.
- Punch-out and clean: Replace plates and trims, test fixtures, polish tile, and remove debris. Photograph for records.
Bundle related tasks—paint touch-ups, vanity or fixture swaps, and threshold resets—so you only mobilize once. This is especially useful when coordinating multiple units.
Timelines and downtime planning
Actual durations depend on scope, drying/curing times, unit size, and crew access. For bathroom tile replacement for rentals, the active work often fits into a compact, sequenced window when the substrate is in good condition and materials are on hand. Plan extra buffer if you anticipate substrate repairs, plumbing adjustments, or waterproofing upgrades.
Tips to keep schedules predictable:
- Pre-approve finishes and patterns before vacancy to avoid decision delays.
- Stage materials in a secure on-site room or have them delivered just in time with clear labelling by unit.
- Use standardized SKUs and trims to reduce special orders and backorders.
- Batch similar tasks across units (e.g., demo all, then waterproof all) to streamline crew flow in multi-unit buildings.
- Build in curing time for waterproofing, thinset, and grout—rushing this step invites call-backs.
Cost drivers to watch (without surprises)
While you’ll set budgets per property, it helps to isolate the variables that move the needle. For bathroom tile replacement for rentals, the major drivers typically include:
- Substrate condition: Hidden water damage, uneven slabs, or deteriorated backer board increase prep and material needs.
- Scope size: Re-tiling a tub/shower surround only vs. surround plus full floor and base course has different labour and material profiles.
- Tile format and patterning: Complex patterns, intricate mosaics, and large-format panels raise layout and cutting time.
- Penetrations and details: Niches, benches, windows, multiple valves, or out-of-plumb walls demand extra time to align cuts.
- Access and logistics: Upper floors without elevators, tight parking, and limited staging areas slow production.
- Change orders: Late fixture swaps or finish changes can ripple through sequencing and waste material already staged.
To stay on target, lock down a standard package per asset, including tile, trim, grout, silicone, underlayment/backer, and waterproofing components. Keep a short list of alternates that are visually interchangeable in case of supply hiccups.
Quality standards and checks that reduce call-backs
Consistent, documented standards are essential when multiple units, crews, or vendors are involved. Incorporate these checks into your turnover playbook:
- Substrate flatness: Verify plane and plumbness meet tile manufacturer tolerances before setting tile; correct with patch or self-leveler where needed.
- Waterproof continuity: Inspect seams, corners, and penetrations for full coverage and proper cures; flood-test pans or wet zones where appropriate for your scope.
- Layout alignment: Ensure cut tiles at corners and ceilings are balanced, and grout joints remain consistent through fixtures and niches.
- Lippage control: Use spacers and leveling systems as needed to keep adjacent tile edges flush.
- Clean joints and terminations: Maintain straight, even silicone beads at all changes of plane; avoid grouting in corners meant for flexible sealant.
- Photograph milestones: Capture substrate prep, waterproofing coverage, and finished work for your records and vendor accountability.
Document these expectations in your scopes of work and pre-walk units with crews so everyone is aligned on the finish standard before work begins.
Maintenance and turnover checklist
Finishes last longer and show better when the property team follows a quick, repeatable routine at each turnover. Build this into your cleaner’s and super’s checklist:
- Grout and caulk health: Inspect for gaps, shrinkage, or mildew; re-caulk changes of plane as needed with quality silicone.
- Ventilation: Confirm fans are operational and ducts clear; moisture control reduces maintenance.
- Sealer touch-ups: If using sealable grout, reapply per product guidance at recommended intervals.
- Fixture checks: Tighten escutcheons, replace worn gaskets, and ensure shower curtains or doors deflect water correctly.
- Cleaning regime: Use pH-appropriate cleaners and avoid harsh abrasives that etch glaze.
- Photo documentation: Capture quick before/after images for your unit file to track condition trends.
Share a one-page care card with new tenants highlighting gentle cleaners and the importance of running the exhaust fan. Small habits prevent early staining and moisture issues.
Standardization for multi-unit portfolios
If you manage several buildings or many units, the biggest win comes from standardization. With bathroom tile replacement for rentals, a repeatable spec trims decision cycles, simplifies procurement, and makes quality control straightforward.
- One spec per asset class: Define a consistent finish package for Class A/B/C properties so visuals match positioning while logistics stay simple.
- Interchangeable alternates: Pre-approve lookalike tile, trim, and grout alternates to navigate stockouts without redesigning.
- Colour control: Keep paint, grout, and silicone colours documented with manufacturer codes for exact matching.
- Fixture coordination: Align valve trims, shower heads, and accessories with tile layout to avoid late-stage conflicts.
- Close-out kit: Store a small cache of attic stock—extra tiles, trims, and grout—for quick in-unit touch-ups.
Standardization also helps new maintenance staff ramp faster and reduces tenant-to-tenant variations that can complicate repairs.
Risk mitigation and safety basics
Bathrooms combine water, power, and confined spaces, so plan with safety in mind. Coordinate shut-offs, protect occupied corridors, and maintain clear access paths. Use appropriate PPE, dust control, and debris handling. Where scopes touch plumbing or electrical connections, engage qualified trades as needed. If you have compliance questions or plan structural changes, consult the appropriate local professionals.
Sample scope template you can copy
Use this outline to request proposals or brief internal teams for bathroom tile replacement for rentals:
- Unit info: Building, floor, unit number, access notes, parking, elevator.
- Scope areas: Tub/shower walls, bathroom floor, base tile/trim, niche(s), bench, window returns.
- Demo details: Tile and backer removal, disposal plan, protection requirements.
- Substrate and waterproofing: Backer board type, waterproofing product, coverage areas, curing expectations.
- Tile package: Manufacturer, SKU, sizes, pattern, orientation, trim type, transitions.
- Grout and sealants: Product, colour, joint width, sealing, silicone locations.
- Coordination: Plumbing fixture model numbers and heights, accessory placements, paint touch-ups.
- Schedule: Requested start, access windows, milestones (demo complete, waterproofing complete, tile complete, punch list).
- Close-out: Cleaning standards, photo documentation, attic stock return, warranty documentation if applicable.
FAQs
How long does bathroom tile replacement for rentals usually take?
Timelines vary with scope and substrate condition. A straightforward tub/shower surround and floor replacement in a small bathroom can often be completed within a compact window once materials are on site and waterproofing and setting compounds have cured properly. Add time if you discover water damage, need extensive substrate correction, or are coordinating work across multiple units.
Can I re-grout instead of replacing the tile?
Re-grouting and re-caulking are viable when tile is sound and the substrate is dry and stable. If grout turns powdery, tiles are loose, or there are signs of moisture behind the surface (musty odour, staining, swollen trim), it’s usually more effective to replace tile and address waterproofing and substrate issues at the same time.
What tile size works best in rental bathrooms?
Mid-size formats tend to balance speed, waste, and aesthetics in small bathrooms. Very large tiles can look premium but are harder to cut around valves and niches; mosaics offer grip but create more grout joints to maintain. Standardizing one or two mid-size SKUs across your properties typically streamlines both installation and future maintenance.
Do I need to waterproof the entire bathroom?
Wet zones—like tub and shower walls and the immediate floor area subject to splash—benefit most from continuous waterproofing paired with properly sealed penetrations and change-of-plane joints. Extending protection beyond obvious wet areas depends on your building’s conditions, desired durability, and scope; discuss your goals with qualified trades when defining your spec.
What’s the most common cause of tile failures in rentals?
Many failures trace back to poor substrate prep or incomplete waterproofing—issues that may not be visible until demo. Taking time to flatten and reinforce substrates, allow proper cure times, and maintain movement joints dramatically reduces call-backs.