Separate entrance construction considerations are the code, design, safety, and sequencing factors you must resolve before cutting a new doorway or building a stairwell to a basement or secondary suite. For multi-unit buildings in London, ON, our team at Mahal Concrete and Constructions streamlines permits, egress, drainage, and fire separations so work proceeds safely and with minimal tenant disruption.
By Mahal Concrete and Constructions • Last updated: 2026-05-07
Above the Fold: Why this guide matters + Table of contents
This complete guide explains how to plan, permit, and build a legal separate entrance to a basement or suite in a multi-unit property. You’ll learn what “egress-ready” means, how drainage and waterproofing protect structures, and the exact steps we use to reduce vacancy time while keeping residents safe.
Here’s what you’ll get from this expert playbook for property managers and landlords:
- Plain-English definitions of legal egress, fire separations, and below-grade stairwells
- A step-by-step process we use in 500+ completed projects
- Design options compared: below-grade stairs, at-grade side doors, and walkouts
- Checklist of separate entrance construction considerations you can reuse
- Local notes for London, ON operations and resident communications
- Actionable best practices that speed inspections and reduce rework
Quick Summary
- Separate entrances must satisfy egress, structure, drainage, waterproofing, and fire-separation rules.
- Successful projects follow a defined sequence: assess, design, permit, build, inspect, and hand over.
- For occupied properties, plan dust control, quiet hours, and safe resident access from day one.
What is a separate entrance?
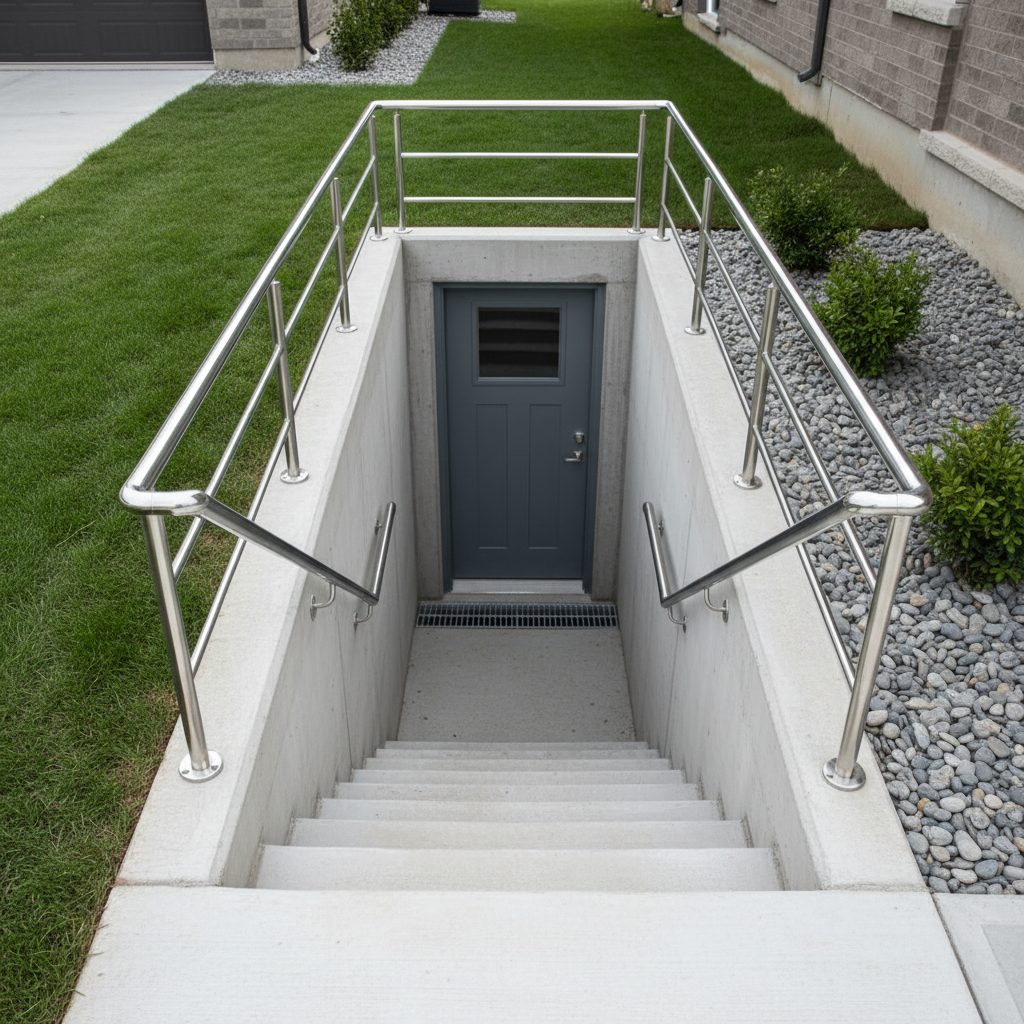
A separate entrance is a dedicated, code-compliant access point to a suite, often created by cutting a new opening in a foundation and adding a stairwell, landing, and exterior door. The entrance must satisfy egress, waterproofing, and structural rules so residents can exit safely in all conditions.
At its core, a separate entrance is about life safety and autonomy for the unit it serves.
- Egress compliance: Door clearance, stair geometry, landings, lighting, and hardware must allow quick evacuation.
- Structural integrity: Lintels/headers, shoring, and cutting methods protect the foundation and load paths.
- Moisture control: Drains, membranes, and flashing keep water out of the new opening and adjacent walls.
- Security and durability: Exterior-grade doors, frames, and hardware withstand high traffic and weather.
In our multi-unit work across Southwest Ontario, we standardize these elements so entrances are consistent across buildings, simplifying maintenance and inspections.
Why a separate entrance matters for multi-unit buildings in London, ON
In London, ON, a separate entrance improves life safety, tenant privacy, and leasing flexibility. For property managers, it also streamlines inspections and helps reduce vacancy periods by delivering move-in-ready, code-aligned suites that appeal to a broader renter pool.
For owners running portfolios, the benefits stack up quickly.
- Safety first: Dedicated egress routes help prevent bottlenecks and support orderly evacuation during emergencies.
- Tenant appeal: Private access boosts perceived value and reduces noise transfer to common areas.
- Operational efficiency: Predictable inspections and standardized details minimize back-and-forth with building officials.
- Portfolio consistency: Replicable assemblies make staff training, repairs, and part sourcing faster.
We’ve found that clearly labeling resident paths, posting temporary wayfinding, and communicating work windows improves satisfaction scores during construction. In occupied buildings, that matters as much as the final door swing.
How separate entrance projects work: step-by-step
The best results follow a defined sequence: assess site conditions, finalize scope, design for code and structure, submit permits, prepare the site, execute foundation work, install drainage and waterproofing, set door and finishes, and complete inspections. Clear steps reduce downtime and surprises.
Our standardized sequence
- Site assessment: Verify grades, utilities, soil conditions, setbacks, and resident access paths.
- Scope + drawings: Determine opening size, lintel spec, stairwell type, and waterproofing details.
- Permitting package: Prepare applications, drawings, and any engineering letters.
- Tenant planning: Set quiet hours, dust control, and alternate access where needed.
- Excavation + shoring: Protect foundations and utilities; cut strictly to plan.
- Structure: Install lintels, frames, and reinforcement before full opening.
- Waterproofing + drainage: Membranes, flashing, drains, and a free-draining base.
- Stairs + landings: Concrete stairwell, guards/handrails, slip-resistant finishes.
- Door + hardware: Exterior door set, weatherstripping, closer, and secure cylinders.
- Quality check + inspection: Document clearances, fasteners, and seals prior to handover.
| Phase | What happens | Owner/Manager input |
|---|---|---|
| Assessment | Measure grades, map utilities, verify code triggers | Provide access, utility as-builts if available |
| Design | Engineer lintel, choose stair type, drainage path | Approve finishes, confirm tenant coordination |
| Permits | Submit drawings, respond to comments | Sign forms, designate contact for inspector |
| Execution | Cut opening, install structure, waterproof, set door | Communicate resident notices and quiet hours |
| Closeout | Final checks, documentation, inspection walk | Sign-off and handover |
In our experience, documenting 25+ checkpoints (fastener types, clear widths, guard heights, seal continuity, and drain slope) prevents delays at inspection. It’s faster to verify once than to rework later.
Separate entrance construction considerations: the essentials
Key considerations include structural support for the new opening, compliant egress geometry, reliable drainage, robust waterproofing, and fire/smoke separation to adjacent units. Plan logistics early for occupied buildings—access paths, dust control, and signage keep residents safe and calm.
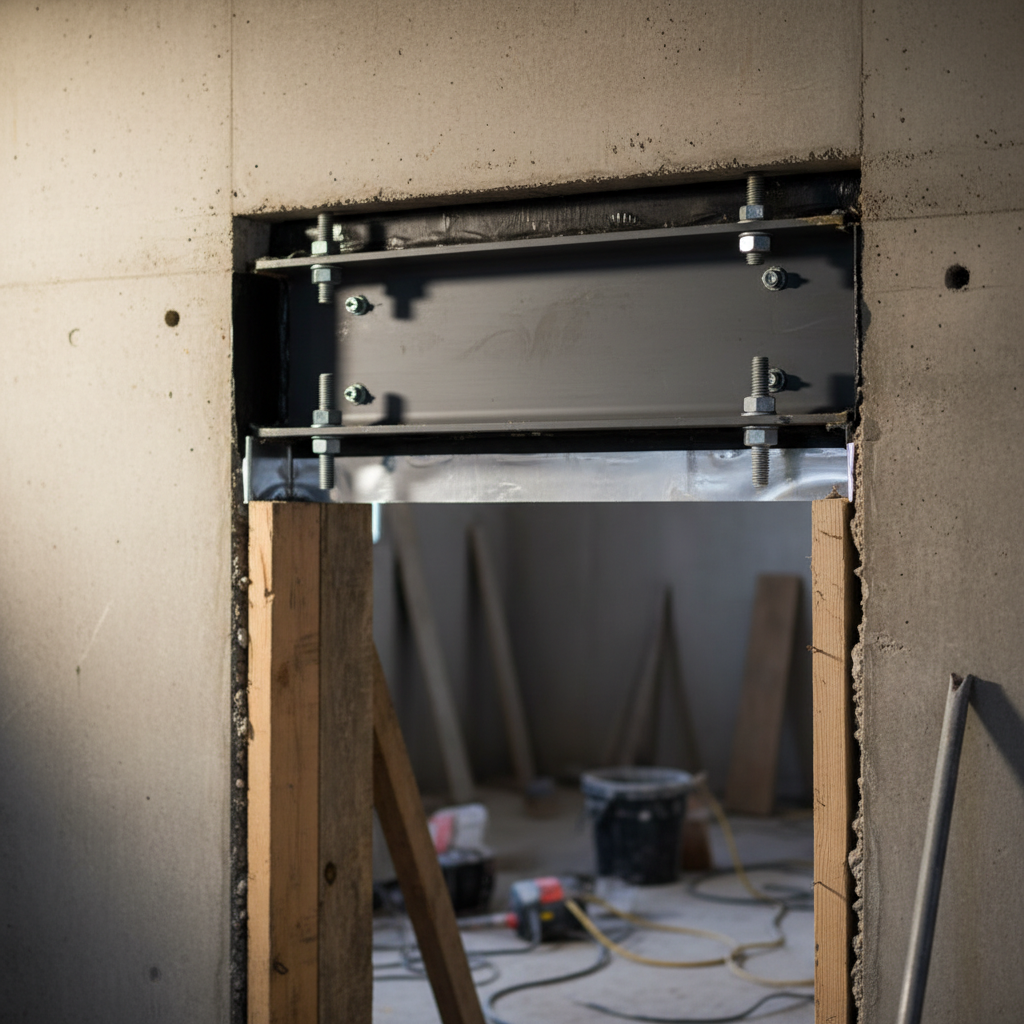
Structure and cutting
- Engineer the lintel: Select steel or LVL sizing to carry loads above the cut.
- Controlled saw-cut: Use sequence cuts to avoid shock loading the wall.
- Temporary shoring: Shore before removing masonry to protect bearing walls.
Egress and accessibility
- Clear width and height: Ensure the doorway, landings, and stair meet local egress dimensions.
- Hardware and lighting: Exterior-rated handles and automatic lighting improve safe exit.
- Surface safety: Slip-resistant treads and positive drainage at landings reduce hazards.
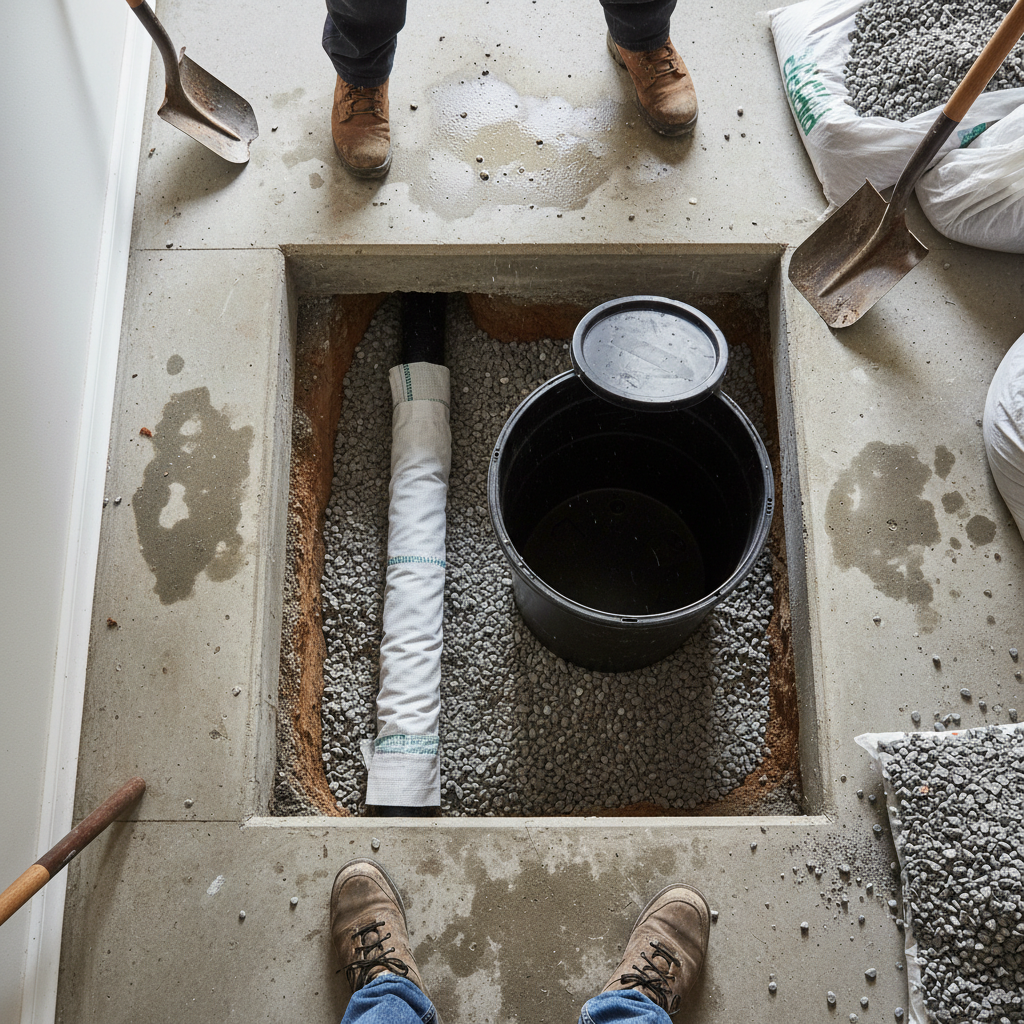
Drainage and waterproofing
- Drain path: Provide a free-draining base with a sump/french drain to prevent standing water.
- Membranes and flashing: Tie into existing damp-proofing; seal all penetrations.
- Redundancy: Grates, trench drains, and proper slope offer backup during heavy rain.
Fire and smoke control
- Rated door assemblies: Use assemblies appropriate for separations between suites and exits.
- Sealing: Firestop at penetrations, frames, and junctions per specification.
- Self-closing devices: Help maintain compartmentation during normal use.
These separate entrance construction considerations reduce risk, simplify inspections, and create durable access for decades.
Design options compared: below-grade, at-grade, walkout
Choose the entrance type that fits grades and structure: below-grade stairwells for basements, at-grade side doors where space allows, or walkouts on sloped lots. Each has trade-offs in excavation, drainage, accessibility, and disruption to existing landscaping.
Common entrance configurations
- Below-grade stairwell: Excavated stair with retaining walls, landing drain, and guardrails.
- At-grade side entrance: Minimal excavation; careful detailing at thresholds and weather exposure.
- Walkout conversion: Uses natural grade changes; larger opening and patio-style door options.
- Shared vestibule upgrade: Adds separation and security without exterior excavation.
| Type | Pros | Watch-outs |
|---|---|---|
| Below-grade stairwell | Independent access; good security; weather-sheltered | Excavation; drainage critical; guard/handrail requirements |
| At-grade side door | Lower disruption; simpler waterproofing | Space and setbacks; threshold water protection |
| Walkout | Natural light; barrier-free potential | Larger structural opening; site grading impacts |
Take a quick look at the yard, foundation exposures, and neighboring structures. The fastest path is often the one that leverages existing grades while staying inside code tolerances.
Permits, codes, and inspections
Separate entrances require drawings and permits before cutting any foundation. Expect plan reviews, possible engineering letters, and staged inspections. Meticulous documentation and photo logs accelerate approvals and reduce call-backs after occupancy.
For a practical overview of permit steps and submittals, see this basement permit guide. It outlines typical application components and common review checkpoints for residential alterations.
Submissions move faster when you pre-answer predictable questions.
- Structural details: Lintel specs, reinforcement, and cutting sequence.
- Drainage layout: Trench drains, sump tie-ins, and slopes.
- Fire separation: Door rating, closer, smoke seals, and wall/ceiling assemblies.
- Door schedule: Swing direction, clear width, hardware.
Application checklists like this permit application guide help owners and managers anticipate reviewer requests, reducing resubmittals. While every municipality differs, well-organized packages consistently lead to fewer comments.
If your project converts space to a secondary unit, many building departments scrutinize egress and separation details. For a broader remodeling context, this basement renovations overview explains how permits relate to safety and long-term value.
Best practices and mistakes to avoid
Standardize details, over-communicate with residents, and document everything. Avoid cutting before permits, under-sizing lintels, skipping redundancy in drainage, or neglecting handrails and lighting. Small oversights create the biggest inspection delays.
Proven best practices
- Pre-build mockup: Dry-fit door and frame to confirm clearances before final set.
- Two-stage waterproofing: Primary membrane plus secondary flashing at critical joints.
- Redundant drainage: Grate plus trench drain at landings with positive slope away from door.
- Inspection kit: Keep specs, fastener samples, and photos on-site for instant verification.
- Resident comms: Weekly notices with milestones and quiet-hour reminders.
Frequent mistakes
- Cutting without shoring or removing too much masonry at once.
- Undersized guards, missing handrails, or poor lighting at stairs.
- Flat landings that pond water at the threshold.
- Skipping firestop at frame interfaces and penetrations.
- Not protecting landscaping or restoring surfaces promptly.
In our portfolio work, establishing a 30-point punch list before the inspector arrives reduces post-inspection items dramatically. That discipline keeps vacancy periods tight and predictable.
Tools, materials, and resources
You’ll need precision cutting tools, engineered lintels, exterior-rated doors, drains and membranes, and compliant guards/handrails. Add checklists, photo logs, and labeled drawings. The right materials and documentation speed approvals and ensure lasting performance.
Field tools and consumables
- Wall saws/track saws, coring rigs, and dust extraction
- Steel lintels or LVLs, anchors, and corrosion-resistant fasteners
- Self-adhered membranes, primers, sealants, and metal flashing
- Trench/grate drains, perforated pipe, sump components, and clean gravel
- Exterior door assemblies, weatherstripping, closers, and security cylinders
- Concrete forms, rebar, treads, guards, and handrails
Documentation aids
- Annotated drawings with callouts for structure, drainage, and egress
- Photo log of concealed work before backfill
- Inspection-ready binder: specs, MSDS, product sheets, and hardware schedules
Download our planning checklist. It’s the exact list our teams use in occupied buildings to keep residents safe and projects on schedule. Visit our main site to request it.
Mini case studies and real-world examples
Across 500+ projects, we’ve standardized separate entrance workflows for speed and consistency. These brief scenarios show how sequencing, documentation, and resident-first logistics translate into smooth inspections and faster move-ins.
Scenario 1: Basement suite in an occupied triplex
- Challenge: Create a below-grade stairwell without disrupting two occupied units.
- Approach: Weekend excavation, weekday quiet-hour cutting, and temporary wayfinding.
- Result: Zero missed inspections and on-time handover with a fully documented photo log.
Scenario 2: At-grade side entrance for a duplex conversion
- Challenge: Limited side yard and setback constraints.
- Approach: Narrow-profile door with enhanced weather detailing and compact landing drain.
- Result: Inspector approved on first visit thanks to clear width documentation and hardware schedule.
Scenario 3: Walkout on a sloped lot
- Challenge: Large opening with significant natural grade change.
- Approach: Engineered lintel, patio-style door, and integrated slope to divert runoff.
- Result: Bright, barrier-friendly access that boosted unit appeal and lease velocity.
Local considerations for London
- Winter freeze-thaw cycles are hard on landings. Plan for drainage redundancy and sealants that tolerate movement.
- Coordinate inspections early around peak snow or rain periods to avoid regrading or delays.
- Occupied multi-unit sites benefit from clear, bilingual notices and a single resident liaison for updates.
Operational and tenant planning
Treat logistics like a first-class workstream: resident notices, secure work zones, dust control, and alternate access keep buildings safe and calm. Clear communication shortens punch lists because teams can work without last-minute changes.
- Communication cadence: Kickoff memo, mid-project update, and pre-inspection notice.
- Site safety: Barricades, signage, lighting, and daily housekeeping at paths of travel.
- Quiet hours: Noise planning for cutting and demolition protects resident satisfaction.
- Data practices: Share only essential resident info; see our privacy policy for principles.
As a WSIB-compliant, fully insured team, we follow safety-first protocols designed for occupied buildings. Standardization protects residents and keeps schedules on track.
Handover, documentation, and quality assurance
Before handover, verify clearances, guard heights, seals, and drainage performance. Provide a maintenance brief with door hardware, sealants, and drains to inspect seasonally. A clean, documented closeout prevents callbacks and speeds leasing.
- Photo and video log: Record concealed work before backfill and after finishes.
- Checklist-driven punch: 30+ items covering structure, water, egress, and finishes.
- Owner package: Drawings, product data, and warranty contacts in one PDF.
- Resident info: Simple instructions for drain grates, lighting, and door care.
Consistent closeout is why we can mobilize quickly across multiple units and still keep outcomes predictable for managers and leasing teams.
Frequently Asked Questions
Here are clear answers to common separate entrance questions from property managers and landlords. Each response focuses on safety, logistics, and code alignment without discussing pricing.
What qualifies as a legal separate entrance?
A legal entrance has a code-compliant door, landing, and stair geometry; proper drainage and waterproofing; and appropriate fire/smoke separation to adjacent spaces. It’s also documented through permits and inspections before occupancy.
Do I need permits before cutting the foundation?
Yes. Separate entrances involve structural changes and life-safety elements. Permits and drawings are required before cutting. Inspectors typically review structure, egress, drainage, and fire separation details during staged visits.
How do you minimize disruption in occupied buildings?
We schedule loud work in short windows, set quiet hours, post notices, and create safe resident paths. Daily housekeeping, dust control, and clear wayfinding help keep buildings calm and reduce complaints.
What drainage is best at a below-grade landing?
Use a free-draining base with a trench or grate drain tied to a sump or gravity outlet, plus positive slope away from the door. Redundancy matters during freeze-thaw and heavy rain to prevent water against the threshold.
Conclusion, key takeaways, and next steps
Separate entrances succeed when structure, egress, drainage, waterproofing, and fire separation are designed as one system. Standardized details, clear documentation, and resident-first logistics keep schedules predictable and inspections smooth.
Key takeaways
- Lock down structure, egress, and water management before you cut.
- Use redundant drainage and two-stage waterproofing at below-grade entries.
- Document 25–30 checkpoints to accelerate inspection sign-offs.
- Communicate early and often with residents in occupied buildings.
What to do next
- Walk the site and photograph grades, walls, and paths of travel.
- Assemble drawings and a permit package with structural details.
- Plan logistics, quiet hours, and resident communications.
- Schedule a discovery call—visit our homepage to get started.
Want our sample submittal checklist? Reach out through the site or see our latest updates on the company blog. Terms for site use are outlined in our terms and conditions.