Legal basement renovation in Woodstock refers to converting a basement into a code-compliant secondary suite. It requires zoning confirmation, a building permit, and life-safety features that align with the Ontario Building Code. From our London base at 805 Chelton Rd, Mahal Concrete and Constructions helps property managers secure approvals with standardized finishes and predictable schedules.
By Amaruppdesh Singh • Last updated: 2026-06-02
Overview and Table of Contents
This complete guide explains how to legalize a basement in Woodstock: what “legal” means, why it matters, the permit and inspection workflow, step-by-step execution, required life-safety features, tools, and real examples. Use the quick links below to jump to the section you need.
- What is a legal basement?
- Why it matters
- Permits and inspections
- Step-by-step guide
- Types and approaches
- Life-safety essentials
- Best practices
- Tools and resources
- Case studies
- FAQ
- Conclusion and next steps
Summary
To legalize a basement in Woodstock, confirm zoning, secure a building permit, and meet core life-safety rules: fire separation, egress, smoke/CO alarms, ventilation, and minimum ceiling height. Schedule staged inspections and document concealed work. A WSIB-compliant contractor reduces disruption and keeps timelines predictable across occupied properties.
For portfolio owners and property managers, we recommend a repeatable playbook. Consistency shortens vacancy periods and simplifies maintenance across multiple units.
- Confirm zoning for a secondary suite and on-site parking allowances.
- Submit permit drawings showing layout, fire separations, egress, and ventilation.
- Install a safe separate entrance or a compliant egress window with clear path of travel.
- Book inspections at framing, rough-ins, insulation/vapor barrier, and final.
- Standardize finishes (flooring SKUs, paint codes) for future turnovers.
- Close out permits with final occupancy documentation.
What is a legal basement apartment in Woodstock?
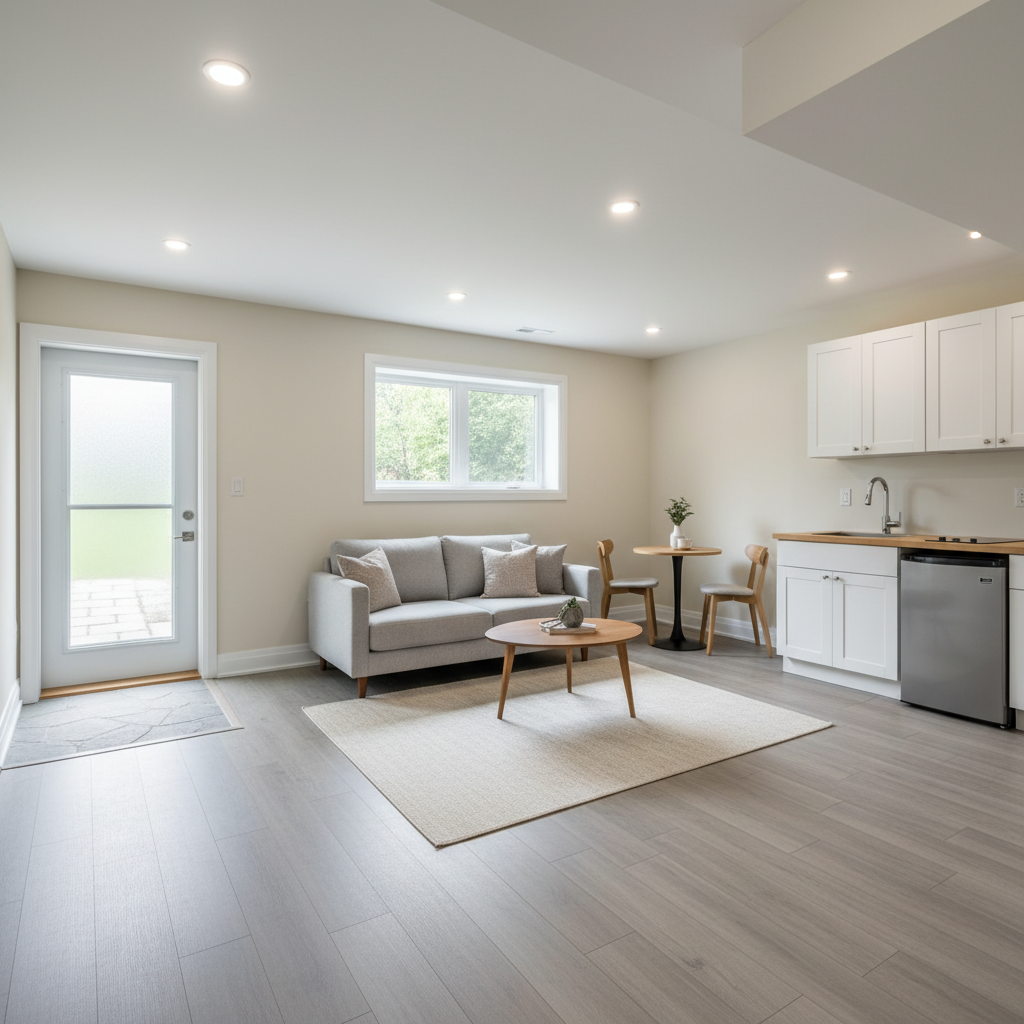
A legal basement apartment in Woodstock, ON is a secondary suite that satisfies local zoning and Ontario Building Code requirements. It needs a building permit, life-safety systems, compliant ventilation, and inspections that culminate in occupancy approval for lawful rental or occupancy.
In plain terms, “legal” means your suite is safe to live in and recognized by the municipality. That hinges on fire separation between units, a reliable exit route, working smoke and carbon monoxide alarms, adequate ventilation, and code-checked headroom. Documented inspections verify these essentials and protect your investment.
Local considerations for Woodstock
- Moisture and freeze–thaw: Plan grading and sump checks before spring to reduce seepage risks during construction.
- Occupied buildings: Coordinate noisier tasks mid-day to minimize tenant impact across multi-unit properties.
- Portfolio standards: Use repeatable finishes across Woodstock buildings to simplify touch-ups and purchasing.
We’ve delivered 500+ projects across Southwest Ontario with a safety-first, WSIB-compliant process. Our goal is consistent, code-ready results that make units move-in ready with minimal disruption.
Why legalizing your basement matters
Legalizing a basement protects life safety, reduces owner liability, and preserves long-term property value. It also signals to tenants and insurers that the suite meets code. Documented compliance supports smoother claims, financing, and future transactions.
Life-safety features are the backbone of lawful suites. Proper fire separation, alarms, and egress are non-negotiable. Beyond compliance, a well-planned secondary suite increases rentability and lowers turnover friction. Standardized finishes across your portfolio shorten make-readies and cut recurring maintenance time.
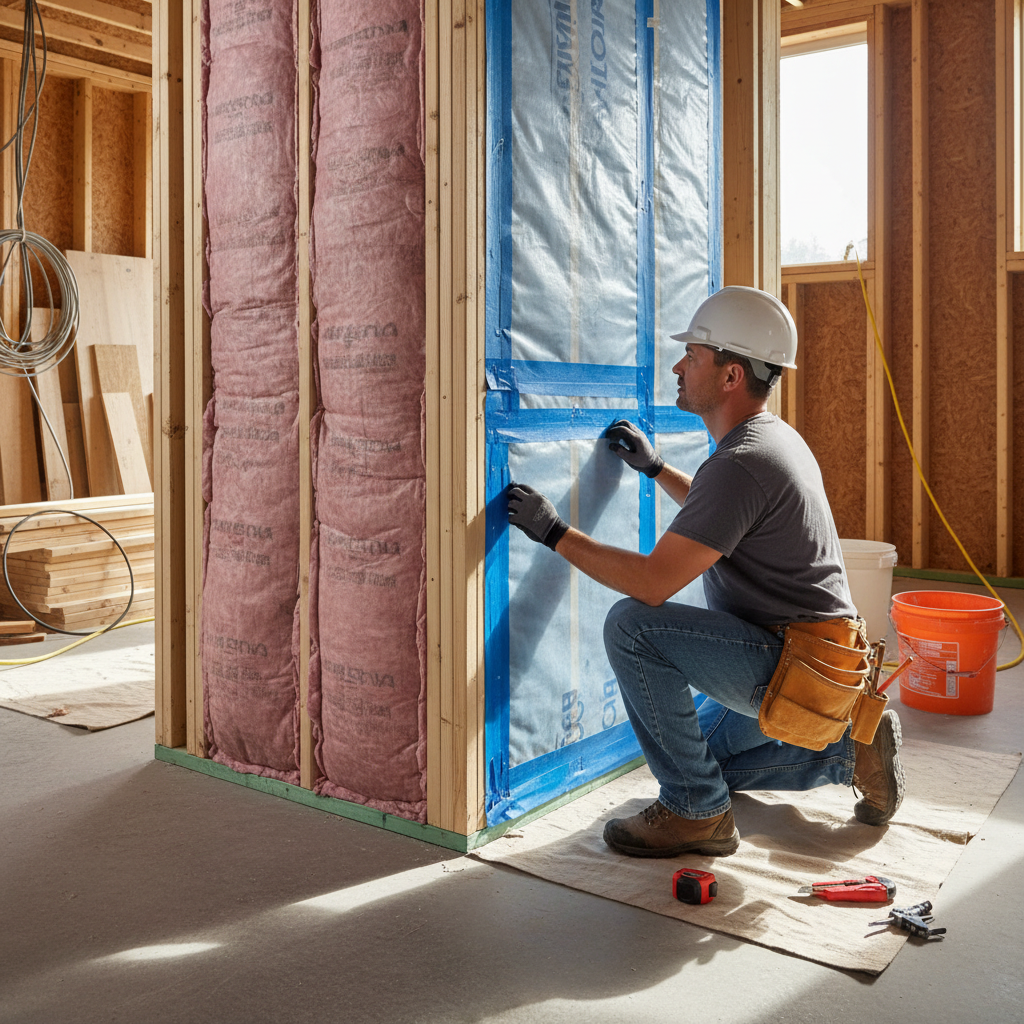
In our experience with multi-unit buildings, owners who document concealed assemblies (fire-stopping, insulation, vapor barriers) face fewer delays at final inspection. Photo logs and as-built notes pay off later when a repair or upgrade is needed.
How the Woodstock permit and inspection process works
Expect a clear sequence: due diligence, a complete building-permit application with drawings, staged inspections (framing, rough-ins, insulation, final), and occupancy. Fast responses to comments and meticulous documentation help keep your schedule on track.
Here’s the practical flow we follow in occupied properties to reduce disruption while staying inspection-ready.
- Due diligence: Verify zoning and parking. Assess moisture history, structure, and mechanical capacity. Identify egress strategies and entrance locations.
- Permit drawings: Prepare scaled plans and sections showing fire-rated assemblies, alarm placement, ventilation, ceiling heights, and separate-entrance details.
- Submission and comments: File the package. Track reviewer notes and address them promptly to avoid resubmission delays.
- Construction and inspections: Build per approved plans. Book inspections at framing, plumbing/electrical rough-ins, insulation/vapor barrier, then final.
- Close-out and occupancy: Final inspection, deficiency correction, and issuance of occupancy documentation for lawful use.
For additional perspective on common permitting steps for legal suites, see an external overview of typical legal basement requirements. Use outside references as context only; always follow your local permit reviewer’s directions.
Your Woodstock legal basement renovation guide: step-by-step
Start with a site assessment, finalize scope and drawings, apply for permits, then execute in a clean sequence: demolition, framing, MEP rough-ins, insulation, drywall, finishes. Book inspections at milestones, document concealed work, and standardize finishes to speed future turnovers.
Step 1: Site assessment and scope
- Measure ceiling heights and note beam/duct locations to plan bulkheads without compromising headroom.
- Check moisture history, foundation cracks, and slab condition; address drainage early to protect new finishes.
- Determine egress: separate entrance, egress window well, or both; confirm clear path of travel to grade.
- Plan fire separations and sound control between the suite and main dwelling; identify door hardware and self-closers.
We’ve found that a 60–90 minute assessment saves days later by preventing redesigns after rough-ins. Document existing mechanicals and any structural limitations before you draw.
Step 2: Drawings and permit package
- Provide dimensioned floor plans, reflected ceiling plans, and elevations with scale and north arrow.
- Specify rated assemblies, smoke/CO detector locations, and any smoke-tight or self-closing door requirements.
- Detail the separate entrance stairwell, drainage, lighting, and landing dimensions.
- Include ventilation notes for fresh air and local exhaust in bathrooms and kitchens.
For a plain-language explanation of common submittal elements, this summary of basement permit steps offers a helpful checklist. Treat third-party guides as general context; your local permit reviewer has the final say.
Step 3: Scheduled execution
- Sequence: demolition, framing, MEP rough-ins, insulation/vapor barrier, drywall, trim, painting, flooring, fixtures.
- Book inspections ahead of time and maintain a daily photo log of fire-stopping, insulation, and vapor control.
- Protect occupied paths of travel with dust control and clear signage; keep noise-intensive tasks mid-day.
- Standardize materials: vinyl plank flooring, washable paint sheens, and durable cabinet/hardware SKUs.
Our crews operate with WSIB-compliant safety and tenant-friendly scheduling. Clean worksites and predictable milestones reduce complaints and speed final handover.
Step 4: Quality check and handover
- Function-test alarms, self-closers, and egress hardware; verify door swing and clearances.
- Confirm ventilation rates and bathroom exhaust performance; check backdraft dampers and exterior hoods.
- Walk the suite with an owner punch list; record as-built changes on marked-up drawings.
- Deliver a handover packet: paint codes, flooring SKUs, fixture models, and maintenance tips.
For a deeper background on planning considerations that include value and permit implications, this independent overview of basement renovations and permits can provide context. Always defer to your municipal reviewer for specifics.
Need a code-readiness site assessment? Our structured, end-to-end approach reduces vacancy days and surprises. Start with a walkthrough and scope alignment.
Schedule your assessment and we’ll map permits, inspections, and standardized finishes for your Woodstock property.
Types of basement conversions and approaches
Basement suites differ by entrance type, egress strategy, layout size, and the level of structural change. Choose the least-invasive option that still meets egress, fire separation, ventilation, and headroom rules. Align your choice with moisture control and future maintenance.
Common approaches we build
- Separate entrance (side or rear): Frost-protected stairwell, lighting, handrails, and drainage tied into a proper storm path.
- Egress window well: Code-clearances, ladder where required, and gravel drainage to protect against backfill pressure and water.
- Acoustic control: Resilient channels and mineral wool to reduce sound transfer; target robust performance for tenant comfort.
- Compact kitchenette: Durable, easy-clean finishes with anti-slam hinges and standardized cabinet hardware.
Layout patterns that rent well
- Studio: Open plan with condensed kitchenette and shared laundry access.
- One-bedroom: Partitioned sleeping room near natural light and egress.
- Two-bedroom: Strategic framing around ducts/beams; careful bulkhead planning to maintain headroom.
- Accessibility-minded: Wider doors, lever handles, and clear turning radii where feasible.
| Egress option | Best for | Pros | Watch-outs |
|---|---|---|---|
| Separate entrance stairwell | Full suites with frequent use | Dedicated access, strong tenant appeal | Requires drainage, frost protection, and lighting design |
| Egress window well | Studios/1-bed where layout is tight | Less structural change than a new stairwell | Must meet size/clearance rules; protect against moisture |
| Shared interior stair | Owner-occupied duplexes | Simpler framing; fewer exterior changes | Fire/smoke separation and self-closers are critical |
Life-safety and code essentials you can’t skip
Focus on egress, fire separation, alarms, ventilation, and minimum ceiling height. These determine permit approval and safe occupancy. Address moisture management and sound performance early to avoid failed inspections and premature wear.
Think in systems—exiting, compartmentation, detection, and air quality. Integrate them into drawings so inspectors can verify intent before work starts. During construction, photograph concealed assemblies like fire-stopping and vapor control to document compliance for final inspections and future maintenance.
- Egress: Provide a door or window that meets emergency escape dimensions with a clear path to grade.
- Fire separation: Rated ceilings/walls between units; smoke-tight, self-closing doors where required.
- Alarms: Interconnected smoke and carbon monoxide detection near sleeping rooms.
- Ventilation: Fresh air plus local exhaust for kitchens and baths; verify exterior hood terminations.
- Ceiling height: Maintain clear height and plan bulkheads carefully around ducts and beams.

Best practices for a smooth approval
Standardize finishes and over-communicate with inspectors. Book inspections ahead, document concealed work, protect occupied areas, and test life-safety devices before finals. Moisture and sound control improve livability and reduce early maintenance calls.
Owners managing multi-property portfolios gain the most from consistency. Align on flooring SKUs, paint codes, hardware models, and ventilation units. Create a single turnover playbook that repeats across buildings. It’s easier to train staff, stock spares, and troubleshoot.
- Scope clarity: Lock specs before submission to prevent redesigns after permit review.
- Documentation: Keep photo logs of fire-stopping, insulation, and vapor barriers for final sign-off.
- Moisture control: Grading fixes, sump checks, and backwater protection where conditions warrant.
- Acoustics: Target robust performance with mineral wool and resilient channel ceilings.
- Durability: Waterproof vinyl plank, washable paints, and solid-surface counters withstand high traffic.
For separate-entrance nuances—stair geometry, landings, drainage—review our focused primer on separate entrance construction. Coordinating these early prevents repeated excavation and rework.
Tools and resources property managers actually use
Use a standardized toolkit: zoning checklist, permit drawing template, inspector-ready photo log, product schedules, and turnover playbooks. These tools reduce variance across units, compress schedules, and support maintenance audits years later.
- Zoning and parking checklist: Confirm secondary suite eligibility and required stalls.
- Permit drawing templates: Fire separations, egress notes, ventilation callouts, and reflected ceiling plans.
- Inspector-ready photo log: Date-stamped images of fire-stopping, insulation, and vapor control.
- Finish standards: Flooring SKUs, paint codes, cabinet hardware models, and lighting types.
- Turnover playbook: Cleaning scopes, punch lists, and handover packets for move-in readiness.
We align tools with our quality framework. See how we create predictable outcomes in our apartment renovation planning checklist and our unit handover quality check. These assets show how standardized finishes and staged inspections work together.
Case studies and real-world examples
Portfolio-standard methods and inspector communication reduce delays and rework. Here are real scenarios where moisture-first planning, clean sequencing, and standardized materials produced on-time occupancy approvals in occupied properties.
Woodstock duplex upgrade
A Woodstock owner wanted a legal suite with strong tenant appeal. We installed a rear separate entrance with lighting and drainage, upgraded alarms, and added mineral-wool sound control. Standard vinyl plank and washable paint simplified touch-ups across both units after turnover.
London fourplex conversion
Two basements required new egress windows and frost-protected stairwells. We coordinated inspections mid-day to avoid tenant conflicts, documented concealed assemblies with photo logs, and achieved occupancy approvals on schedule.
Emergency stabilization to approved suite
After a water incident, we performed emergency drying, structural and surface repairs, then redesigned the basement for a future legal suite. With fire separations documented early, permitting and final sign-off moved faster when the owner greenlit the conversion.
For broader context on common permit factors owners weigh in other markets, this plain-language basement renovation guide offers a general overview. Use it as background only; always follow your Woodstock reviewer’s notes.
Frequently Asked Questions
Owners and property managers often ask about permits, entrances, inspection timing, and standardization. These answers are concise so you can act quickly or share with your team.
Do I always need a building permit for a basement suite?
Yes. A secondary suite introduces life-safety requirements that must be inspected—egress, fire separation, alarms, ventilation, and headroom. Unpermitted work risks enforcement and can affect insurance and financing.
What counts as a legal separate entrance?
A legal entrance provides safe, unobstructed egress with compliant stairs, landings, lighting, and door hardware. If a window serves as egress, it must meet emergency escape size and clearance rules and lead to a safe path of travel.
How do inspections typically sequence?
Typical milestones include framing, plumbing/electrical rough-ins, insulation/vapor barrier, and final. Book early, correct noted items promptly, and maintain a dated photo log of concealed assemblies to keep the schedule moving.
Can I standardize finishes across multiple units?
Yes. Standard SKUs for flooring, paint, and fixtures streamline purchasing, speed touch-ups, and present consistent appeal across your portfolio. It also simplifies maintenance requests and training.
What should I document for final inspections?
Capture date-stamped photos of fire-stopping, insulation, vapor barriers, and penetrations before they’re closed. Keep as-built markups that reflect any approved field changes. This documentation accelerates final sign-off and helps future repairs.
Conclusion and next steps
Legalizing a basement in Woodstock is straightforward when you follow a clear plan: verify zoning, prepare permit-ready drawings, execute in a clean sequence, and document life-safety measures. Standardized finishes and a WSIB-compliant contractor keep schedules on track.
- Confirm feasibility and document existing conditions with a site assessment.
- Develop permit drawings that highlight life-safety systems and egress.
- Book inspections at milestones and maintain a detailed photo log.
- Standardize finishes to shorten future turnovers and reduce maintenance variance.
- Engage a multi-unit specialist for predictable delivery in occupied properties.
Key takeaways
- Life-safety systems—egress, fire separation, alarms, ventilation—drive approvals.
- Staged inspections and photo documentation prevent delays at final sign-off.
- Standardized finishes create predictable, move-in-ready results across units.
- WSIB-compliant teams reduce risk while working in occupied buildings.
Ready to move from idea to approved, move-in-ready space? Book a discovery session and we’ll map a low-disruption path for your Woodstock property.